Category Archives: Exchange Server HowTo

How to ?

How to add a Second Domain with E-mail Address Policy on Exchange 2010

One of the administrators came with an request from one of the managers… to add a new domain on the exchange server so he can have configured on his outlook the account: manager@newdomain.com.

Ok, so now we have to do this scenario:
New domain: aurelpro.com
We need to make the address: manager@aurelpro.com

1. Buy the new domain name. In our example we will use the 1and1 website to buy www.aurelpro.com

2. After the domain is active, we have to set the MX Records ( In our case the 1and1 admin panel ):

3. Then open Exchange 2010 Management Console, and go to Organization Configuration / Hub Transport and then to the Accepted Domains tab and right click on the white section and select New Accepted Domain:

4. The New Accepted Domain Wizard will appear. Here we set the:
Name ( to help you identify the domain in the list )
Accepted domain ( The domain name, in our case: aurelpro.com )
Authoritative Domain ( if you want to deliver the e-mails to this domain, used in our example )
When ready press NEW:

5. In the next screen review the changes and press FINISH:

6. The next step is to create an e-mail address policy, so that every user from the IT Department ( in our case scenario ) will have an @aurelpro.com e-mail address.
*If you want to manually add a new e-mail address go directly to STEP 13 !

So we go to the EMC ( Exchange Management Console ) / Organization Configuration / Hub transport/ E-mail Address Policies Tab / right click on the white zone and select New E-mail Address Policy:

7. The wizard will appear, and here we select:
Name ( the name of the new policy, so we can identify it in the list )
Recipient Container ( the OU that will use the policy, in our case: the whole aurelp.com domain )
All recipient types ( you can select specific users type, depending of you scenario )
After completing click NEXT:

8. On the next step we select the conditions for our policy. In our case it will be for the Recipients in a Department ( IT ). Select the conditions that fits your case and click NEXT:
*The department has to be filled for the users AD objects for the condition to work !


9. In the next step we have to enter the e-mail addresses. Click on the ADD button and then select thetype you want ( in our case First name.last name -> aurel.proorocu@aurelpro.com ), and specify theFQDN for the e-mail address ( in our case: aurelpro.com ). Then click OK and NEXT:

10. Now we have to set the Schedule. We will run this policy Immediately, but you can custom it to fit your scenario. Then click NEXT:

11. In the final step we review the configuration. Review it and click NEW:

12. After the Completed status appear we can click FINISH, and enjoy your new policy for the new domain:

13. Skip this step and 14 if you made the policy ! If you want to manually create a new SMTP address,open EMC ( Exchange Management Console ) and go to Recipient Configuration / Mailbox Right clickon the user you want to add the new address to / select Proprieties:

14. Then go to the E-mail Addresses tab and click on ADD. Now insert the new alias for the user ( in our case aurel.proorocu@aurepro.com ). Then click OK OK:

15. The final step is to test that the new domain e-mail server works. Go to www.mxtoolbox.com / MX lookup and enter the command: “mx:aurelpro.com” ( *replace aurelpro.com with your domain ) and click on Lookup.
If the e-mail servers appear then the MX records work and you can proceed in sending one incoming and one outgoing e-mail from the new domain addresses. If that also succeds then you can enjoy your new domain e-mail addresses !


ENJOY.

And if you encounter any problems feel free to comment contact me.

How to Send As and Send on Behalf Of in OWA 2010

If you need to configure Send As or Send on Behalf in Exchange 2010 read this post:https://www.aurelp.com/?p=369


If you already have the permissions follow this tutorial to make the configuration in OWA 2010:

1. In the first step we will enable the BCC and From fields, that are by default hidden in Owa 2010.
Open OWA 2010 in your browser, log in, and after that go to Options Settings Mail, and scroll down to Message Format and select: Always show BCC and Always show From:

2. Make a new e-mail, and if you can see From field ( if not repeat step 1 ) click on it and select
“Other e-mail address…” and select the account you have the Send-As or Send on Behalf of permission:

3. Send the e-mail. If it succeeds then your mail would look like this ( in the Sent items folder ):
( In our scenario Test send a mail on behalf of Aurel Proorocu )

4. If you get the error: ‘You don`t have the permissions required to send messages from this mailbox’ , you should check if you selected the account you have rights, and if it`s ok you should see if you really have permissions over that mailbox ( check this post regarding Exchange 2010 howto: https://www.aurelp.com/?p=369 )


ENJOY.

And if you encounter any problems feel free to comment contact me.


Delegate user access to mailbox with Add-ADPermission | Using Exchange Shell

The first step is to check the actual permissions of the user.

1. Open EMS ( Exchange Management Shell ) and insert the command:
Get-Mailboxdatabase | get-ADPermission -User aurel.proorocu
*Replace aurel.proorocu with the user you want to check

This will show if the user doesn’t have rights:

This will show if the user have rights:

2. Run one of the following cmdlets:

Get-Mailboxdatabase | Add-ADPermission -User aurel.proorocu -AccessRights ExtendedRight -ExtendedRights receive-as, send-as
*Replace aurel.proorocu with the user you want to grant access to

Get-Mailboxdatabase | Add-ADPermission -User aurel.proorocu -AccessRights ExtendedRight -ExtendedRights ms-exch-store-admin, receive-as, send-as
*Replace aurel.proorocu with the user you want to grant access to


ENJOY.

And if you encounter any problems feel free to comment contact me.

How to Send on behalf / Send as in Exchange 2010

Send on behalf and Send as are quite similar.

Send on behalf will permit a user to send e-mails as another user, but it will show that it was send by administrator@aurelp.com on behalf of aurel.proorocu@aurelp.com ( the case in this example ).

Send as will give a user ( administrator@aurelp.com ) the permission to send mail as another user ( aurel.proorocu@aurelp.com ). In this case the recipient will see only aurel@aurelp.com in the from field. He will never know that X send that e-mail

A. Send on Behalf
There are 3 ways to accomplish this ( using Outlook Delegates / using Exchange Management Shell / using Exchange Management Console )

a. Using Outlook Delegates

1. Open Outlook 2010, go to File Tab / Info / click on Account Settings / select Delegate Access from the drop down menu:

2. On the delegates window, click ADD :

3. Select the user you want to delegate access to, and click OK:

4. At the next step you delegate the permissions to the user. To give the user Send on behalf rights, you ahve to select Editor or Author in the Tasks section.
If you need to give other special rights select them, and then click OK:
upload18

5. At the final step select if you want to receive a copy of meeting requests and responses. Then click OK:

b. Using Exchange Management Console

1. Open EMC ( Exchange Management Console ), then expand Microsoft Exchange Recipient Configuration / Mailbox. Then right click on the user that you want to grand access to and selectProprieties:


2. Then go to Mail Flow Settings tab / Click on Delivery Options / And in the Delivery Options window click on ADD and select the user you want to give rights to send on behalf. Then click OK OK :

c. Using Exchange Management Shell

1. Open EMS ( Exchange Management Shell ) and insert the following command:

Set-Mailbox aurel.proorocu -GrantSendOnBehalfTo Administrator

*replace aurel.proorocu with the user that will share his mailbox
**replace administrator with the user that will send on behalf

B. Send As
As we know from Exchange 2007 there are 2 ways to accomplish this ( using Exchange Management Shell / using Exchange Management Console ):

a. Using Exchange Management Console

1. Open EMC ( Exchange Management Console ), then expand Microsoft Exchange Recipient Configuration / Mailbox. Then right click on the user that you want to grand access to, and click Manage Send As Permission:

2. Click ADD and select the user you want to grant Send As Permission, then click Manage:

b. Using Exchange Management Shell

1. Open EMS ( Exchange Management Shell ) and insert the following command:

Add-ADPermission -Identity “Administrator” -User aurel.proorocu -AccessRights ExtendedRight -ExtendedRights “send as”

*replace administrator with the identity of the user that will share his mailbox
**replace aurel.proorocu with the user that will send AS

ENJOY.

And if you encounter any problems feel free to comment contact me.

Exchange 2010 Windows Services Explained

Microsoft Exchange Active Directory Topology – Provides Active Directory topology information to Exchange services. If this service is stopped, most Exchange services are unable to start. This service has no dependencies. ( Default startup type: Automatic )

Microsoft Exchange ADAM – Stores configuration data and recipient data on the Edge Transport server. This service represents the named instance of Active Directory Lightweight Directory Service (AD LDS) that’s automatically created by Setup during Edge Transport server installation. This service is dependent upon the COM+ Event System service. ( Default startup type: Automatic )

Microsoft Exchange Address Book – Manages client address book connections. This service is dependent upon the Microsoft Exchange Active Directory Topology service. ( Default startup type: Automatic)

Microsoft Exchange Anti-spam Update – Provides the Microsoft Forefront Protection 2010 for Exchange Server anti-spam update service. On Hub Transport servers, this service is dependent upon the Microsoft Exchange Active Directory Topology service. On Edge Transport servers, this service is dependent upon the Microsoft Exchange ADAM service. ( Default startup type: Automatic )

Microsoft Exchange Credential Service – Monitors credential changes in AD LDS and installs the changes on the Edge Transport server. This service is dependent upon the Microsoft Exchange ADAM service. ( Default startup type: Automatic )

Microsoft Exchange EdgeSync – Connects to an AD LDS instance on subscribed Edge Transport servers over a secure LDAP channel to synchronize data between a Hub Transport server and an Edge Transport server. This service is dependent upon the Microsoft Exchange Active Directory Topology service. If Edge Subscription isn’t configured, this service can be disabled. ( Default startup type: Automatic )

Microsoft Exchange File Distribution – Distributes offline address book (OAB) and custom Unified Messaging prompts. This service is dependent upon the Microsoft Exchange Active Directory Topology and Workstation services. ( Default startup type: Automatic )

Microsoft Exchange Forms-Based Authentication – Provides forms-based authentication to Microsoft Office Outlook Web App and the Exchange Control Panel. If this service is stopped, Outlook Web App and the Exchange Control Panel won’t authenticate users. This service has no dependencies. ( Default startup type: Automatic )

Microsoft Exchange IMAP4 – Provides IMAP4 service to clients. If this service is stopped, clients won’t be able to connect to this computer using the IMAP4 protocol. This service is dependent upon the Microsoft Exchange Active Directory Topology service. ( Default startup type: Manual )

Microsoft Exchange Information Store – Manages the Exchange Information Store. This includes mailbox databases and public folder databases. If this service is stopped, mailbox databases and public folder databases on this computer are unavailable. If this service is disabled, any services that explicitly depend on it will fail to start. This service is dependent on the RPC, Server, Windows Event Log, and Workstation services. ( Default startup type: Automatic )

Microsoft Exchange Mail Submission Service – Submits messages from the Mailbox server to Exchange 2010 Hub Transport servers. This service is dependent upon the Microsoft Exchange Active Directory Topology service. ( Default startup type: Automatic )

Microsoft Exchange Mailbox Assistants – Performs background processing of mailboxes in the Exchange store. This service is dependent upon the Microsoft Exchange Active Directory Topology service.
Microsoft Exchange Mailbox Replication Service – Processes mailbox moves and move requests. This service is dependent upon the Microsoft Exchange Active Directory Topology and Net.Tcp Port Sharing service.
Microsoft Exchange Monitoring – Allows applications to call the Exchange diagnostic cmdlets. This service has no dependencies. ( Default startup type: Automatic )

Microsoft Exchange Monitoring – Allows applications to call the Exchange diagnostic cmdlets. This service has no dependencies. ( Default startup type: Manual )

Microsoft Exchange POP3 – Provides POP3 service to clients. If this service is stopped, clients can’t connect to this computer using the POP3 protocol. This service is dependent upon the Microsoft Exchange Active Directory Topology service. ( Default startup type: Manual )

Microsoft Exchange Protected Service Host – Provides a host for several Exchange services that must be protected from other services. This service is dependent upon the Microsoft Exchange Active Directory Topology service. ( Default startup type: Automatic )

Microsoft Exchange Replication Service – Provides replication functionality for mailbox databases on Mailbox servers in a database availability group (DAG). This service is dependent upon the Microsoft Exchange Active Directory Topology service. ( Default startup type: Automatic )

Microsoft Exchange RPC Client Access – Manages client RPC connections for Exchange. This service is dependent upon the Microsoft Exchange Active Directory Topology service. ( Default startup type: Automatic)

Microsoft Exchange Search Indexer – Drives indexing of mailbox content, which improves the performance of content search. This service is dependent upon the Microsoft Exchange Active Directory Topology and Microsoft Search (Exchange Server) services. ( Default startup type: Automatic )

Microsoft Exchange Server Extension for Windows Server Backup – Enables Windows Server Backup users to back up and recover application data for Microsoft Exchange. This service has no dependencies. ( Default startup type: Manual )

Microsoft Exchange Service Host – Provides a host for several Exchange services. On internal server roles, this service is dependent upon the Microsoft Exchange Active Directory Topology service. On Edge Transport servers, this service is dependent upon the Microsoft Exchange ADAM service. ( Default startup type: Automatic )

Microsoft Exchange Speech Engine – Provides speech processing services for Unified Messaging. This service is dependent upon the Windows Management Instrumentation (WMI) service. ( Default startup type:Automatic )

Microsoft Exchange System Attendant – Forwards directory lookups to a global catalog server for legacy Outlook clients, generates e-mail addresses and OABs, updates free/busy information for legacy clients, and maintains permissions and group memberships for the server. If this service is disabled, any services that explicitly depend on it will fail to start. This service is dependent on the RPC, Server, Windows Event Log, and Workstation services. ( Default startup type: Automatic )

Microsoft Exchange Throttling – Limits the rate of user operations. This service is dependent upon the Microsoft Exchange Active Directory Topology service. ( Default startup type: Automatic )

Microsoft Exchange Transport – Provides SMTP server and transport stack. On Hub Transport servers, this service is dependent upon the Microsoft Exchange Active Directory Topology service. On Edge Transport servers, this service is dependent upon the Microsoft Exchange ADAM service. ( Default startup type:Automatic )

Microsoft Exchange Transport Log Search – Provides remote search capability for Microsoft Exchange Transport log files. On Hub Transport servers, this service is dependent upon the Microsoft Exchange Active Directory Topology service. On Edge Transport servers, this service is dependent upon the Microsoft Exchange ADAM service. ( Default startup type: Automatic )

Microsoft Exchange Unified Messaging – Enables Microsoft Exchange Unified Messaging features. This allows voice and fax messages to be stored in Exchange and gives users telephone access to e-mail, voice mail, calendar, contacts, or an auto attendant. If this service is stopped, Unified Messaging isn’t available. This service is dependent upon the Microsoft Exchange Active Directory Topology and the Microsoft Exchange Speech Engine service. ( Default startup type: Automatic )

Microsoft Search (Exchange Server) – This is a Microsoft Exchange-customized version of Microsoft Search. This service is dependent on the RPC service. ( Default startup type: Manual )

ENJOY.

And if you encounter any problems feel free to comment contact me.

How To Configure Receive Connectors in Exchange 2010 | Step By Step

This tutorial is useful for the post-install setup of Exchange 2010.

After you set the Send Connectors and publish the MX records in DNS ( so that other email systems can find the server ) you have to configure the Exchange Server to receive e-mails.
The Hub Transport Server in Exchange is configured by default to not allow other systems to send emails to it. This default configuration is made to encourage the Edge Transport Servers to be set up for receiving mail, because it has a lot of security features that should be used in all organizations.

But, if you have an fresh install, and plan to use an Exchange Server without an Edge Transport you have to change the permissions on the receive connector for the Hub transport servers, using the tutorial bellow:

A. Configure Receive Connector Permissions Using the EMC ( Exchange Management Console )

1. Open EMC ( Start / All Programs / Microsoft Exchange Server 2010 / Exchange Management Console ):

2. Expand Server Configuration ( from the left menu ), and click on Hub Transport. Then right click on the Default Receive Connector, and select Proprieties:

3. After the Proprieties box appears go to Permission Groups Tab, and select Anonymous users, then click OK:

And now the Receive connector is ready to receive e-mails from other Mail Systems.


B. Configure Receive Connector Permissions Using Exchange Management Shell


1. Open Exchange Management Shell ( Start / All Programs / Microsoft Exchange Server 2010 / Exchange Management Shell )

2. Run the following command:

Get-ReceiveConnector “Default WIN-9A156E4DEJN” | Set-ReceiveConnector -PermissionGroups AnonymousUsers, ExchangeUsers, ExchangeServers, ExchangeLegacyServers

*Replace
WIN-9A156E4DEJN -> with the name of you server

ENJOY.

And if you encounter any problems feel free to comment contact me.

How to create a send connector in Exchange 2010 ? Step by Step

At least one send connector must be set up, to ensure that the Exchange 2010 Server knows how to route the outgoing mail requests.
In this example we will create one send connector for the Hub Transport server that will route ALL the outgoing messages. The Hub Transport server will use DNS along with public MX records that were published by other mail servers.

A. Create a Send Connector using the EMC ( Exchange Management Console )

1. Open EMC ( Start / All Programs / Microsoft Exchange Server 2010 / Exchange Management Console ):
upload7

2. Click on Organization Configuration to expand, then click on Hub Transport. Now go to Send Connectors tab, and the right click on the white space and select New Send Connector ( like in the screenshot below ) or click on New Send Connector in the right pane.

3. The wizard launches, and at the first step we must select the Name and the intended use for the Send Connector ( chose the one that fits you best ):
upload8

*More info about intended use for the Send Connector options: 
Custom Select this option to create a customized connector to connect with systems that aren’t servers running Exchange 2010.
Internal Internal Send connectors send e-mail to servers in your Exchange organization. This connector is configured to route e-mail to your internal Exchange servers as smart hosts.
Internet Internet Send connectors send e-mail to the Internet. This connector is configured to use Domain Name System (DNS) MX records to route e-mail.
Partner Partner Send connectors send e-mail to partner domains. This connector is configured to only allow connections to servers that authenticate with Transport Layer Security (TLS) certificates for SMTP domains included in the list of domain-secured domains. You can add domains to this list by using theTLSSendDomainSecureList parameter in the Set-TransportConfig command.
4. At the next step we specify the address space(s) on which the connector will route mail. Click on ADD, and then select the Address. In our case we will use * and we check the include all subdomains.

*More info about this step: 
a. A “*” in the Address indicates that this connector will route all domains that do not match the internal organization’s list of accepted domains.
“Domain.com” in the address indicates that this connector is dedicated to sending email to domain.com addresses.
b. “*.aurelp.com” in the address space indicates that this connector is used for sending email to recipients in aurelp.com and any sub-domains.
c. Cost is used to set the priority of this connector, used when two or more connectors are configured for the same address space. The lower the cost higher the priority.
d. A Scoped Send connector identifies which Hub Transport servers can use this connector. Send connectors are objects stored in Active Directory and, as they are also an organization configuration object, can normally be used by any Hub Transport servers in the organization. If you want to restrict the scope of the Send connector, so as to limit its use to just within the AD site of the Hub server it was created on, then this option needs to be checked.

5. After you configure the Address space, click NEXT:
upload9
6. At the Network Settings step we will chose the first option then click NEXT.
upload10

*More info about this step:

Route mails though to one or more smart hosts:
The option to use Domain Name System MX records to route email automatically should be taken when you want your Send connector to talk directly with the destination SMTP server’s gateway and deliver the emails to that destination gateway itself. You need to make sure that DNS is properly configured for the server to resolve the Destination MX Records.
Alternatively, if you select the route mail through the following smart hosts option, you will need to supply one or more IP addresses or the FQDN of the smart host which is going to accept the email from this connector. Obviously, you need to make sure that the smart host is capable of delivering emails to the destination SMTP server.

The options available for control authentication with the smart host servers are:
None: The smart host does not require any authentication, and it accepts anonymous connections.
Basic Authentication: You will need to provide the smart host with an appropriate username and password to authenticate the connection. If you have multiple smart hosts, then you will need to make sure that they all allow access to the same username and password. Basic Authentication sends the credentials as plain text, and checking Basic authentication Over TLS will enable encryption on the communication.
Exchange Server Authentication: This option authenticates the connection to a smart host using an Exchange authentication mechanism, such as TLS direct trust or TLS\Kerberos.
Externally Secured: Select this option if the connection to the smart host is secured by external means, such as being physically secured over a private network or secured using Internet Protocol security (IPsec).

7. At the next step we set the source server. Ensure that the correct one is selected ( Adding only required servers helps to ensure that only specific servers are able to participate in email delivery to the Internet or other partner networks. ), then click NEXT:

upload11

8. At the final step we review the summary. When ready click NEW:
upload12

9. After the Completed status appears, you can click Finish:
upload13

10. And now the new Connector will be ENABLED in the Send Connectors Tab:
upload14

B. Create a Send Connector using the Exchange Management Shell

Info: We will create a Send Connector who will route mail through the smart hosts ( 192.168.0.2 and 192.168.0.3 ) with the Authentication: None.

1. Open Exchange Management Shell ( Start / All Programs / Microsoft Exchange Server 2010 / Exchange Management Shell )
upload15

2. Run the following command:

New-SendConnector -Name `AurelP.com’ -Usage `Custom’ -AddressSpaces `SMTP:*;1′ -IsScopedConnect or $false -DNSRoutingEnabled $false -SmartHosts `[192.168.0.2]`,’[192.168.0.3]` -SmartHostAuthMechanism `None’ -UseExternalDNSServersEnabled $false -SourceTransportServers `WIN-9A156E4DEJN’

*replace 
AurelP.com with the name you want to set for your new connector.
192.168.0.2 and 192.168.0.3 with the smart host servers you want to use
WIN-9A156E4DEJN with the name of the Source Transport Server

*SmartHostAuthMechanism `None’ -> None is the authentication for the smart host.

upload16

3. After the shell command had been run, the new connector will also appear in the Send Connectors Tab in the EMC.

upload17
4. If you want to check the setup of one connector, you can use the Sendconnector cmdlet:

Get-sendconnector “Aurelp.com”

*replace 
AurelP.com with the name of the connector you want to check.

ENJOY.

And if you encounter any problems feel free to comment contact me.

Exchange 2010 not receiving external mail | Step by step

One quite common problem that administrators might encounter is this:

Scenario: Exchange 2010 environment. The external mails are not being received, and if someone from the organization sends an e-mail to an external receipt it works with no problems.

Cause: Forced reboot / Power down

1. The first step that probably all administrators will do is to check what is happening to those e-mails that are received. Send a test mail from an external e-mail address ( like gmail / yahoo ) to your internal e-mail address, and then go to EMC ( Exchange Management Console ), then click on Toolbox in the right menu, and after that double-click on Message Tracking. A new ie window will appear, and you will be prompted for login. After that go to: search for messages i’ve received from select user / and enter the address from were you made the test. Then click OK.

The search results will appear, and then double click on the test message for details. If the delivery report looks like this, go to step 2:

Delivery Report for Aurel Proorocu

Failed
6/27/2011 10:03
The message couldn’t be delivered.

2. Go to Start services.msc / press enter:

3. After the Services window appears, search for Microsoft Exchange Transport, then right-click on it and select restart.

4. Then after the service is restarted repeat the external mail test and it should be ok.

ENJOY.

And if you encounter any problems feel free to comment contact me.

How to Install Exchange 2010 in Virtual Environment | Step By Step Tutorial

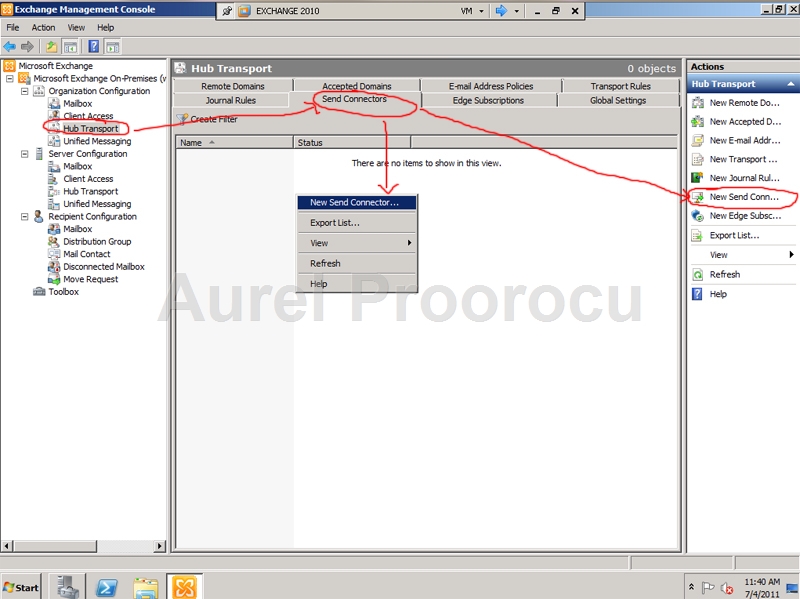
Since the trend is to move more and more from the classical on-premises system to a VM environment, I am going to present today a step-by-step tutorial about how to install Exchange 2010 on a VMWARE Virtual machine ( you can also use this tutorial if you have a Hyper-V Environment ).
The tutorial goes from creating the virtual machine, to installing windows 2008, creating a domain and installing exchange 2010 + post-install setup / updates and test using an windows 7 with Outlook 2010 VM.

This tutorial will show you how to do:
A. Create a virtual machine using VMWARE ( Step 1 )
B. Install Windows Server 2008R2 Enterprise X64 / install WinRar  ( Steps 2-6 )
C. Creating a new domain  ( Steps 7-17 )
D. Installing Exchange 2010 (pre-install / install / post-install )  ( Steps 18-39 )
E. Create a new domain account + an e-mail address for it  ( Steps 40-50 )
F. Install a Windows7 Virtual Machine  ( Step 51 )
G. Join the new machine into the domain  ( Steps 51-53 )
H. Install Office 2010 on it  ( Steps 54-56 )
I. Log with the new user / Install and configure a new Exchange account in Outlook 2010  ( Steps 57-67 )
J. Send a Test e-mail  ( Step 68 )
K. Test the webmail ( OWA 2010 )  ( Step 69 )
*You can use this tutorial for any steps, ex. if you have to join a machine to a domain read the 40-50 Steps

STEPS:

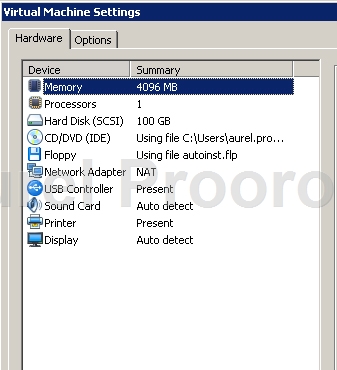
1. Make a new virtual machine, in our example i am going to use 1 processor / 4Gb ram and 100GB HDD space:

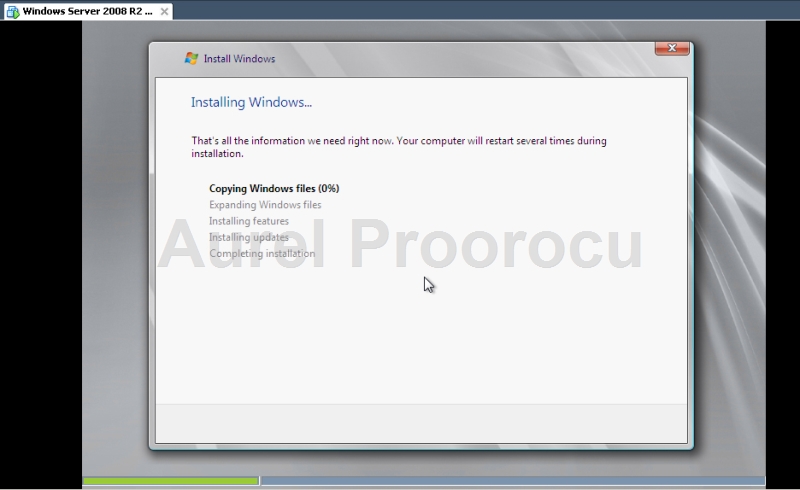
2. The operating system i am going to use is Windows Server 2008R2 Enterprise x64. So I start the install:

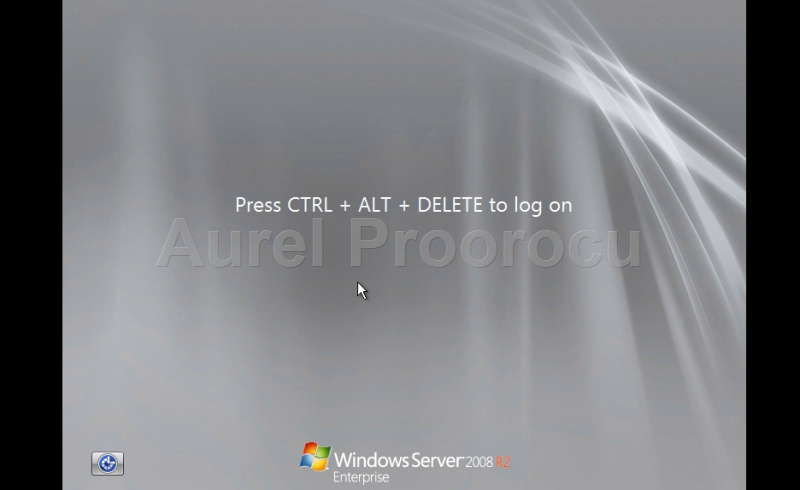
3.After the install had finished log on:

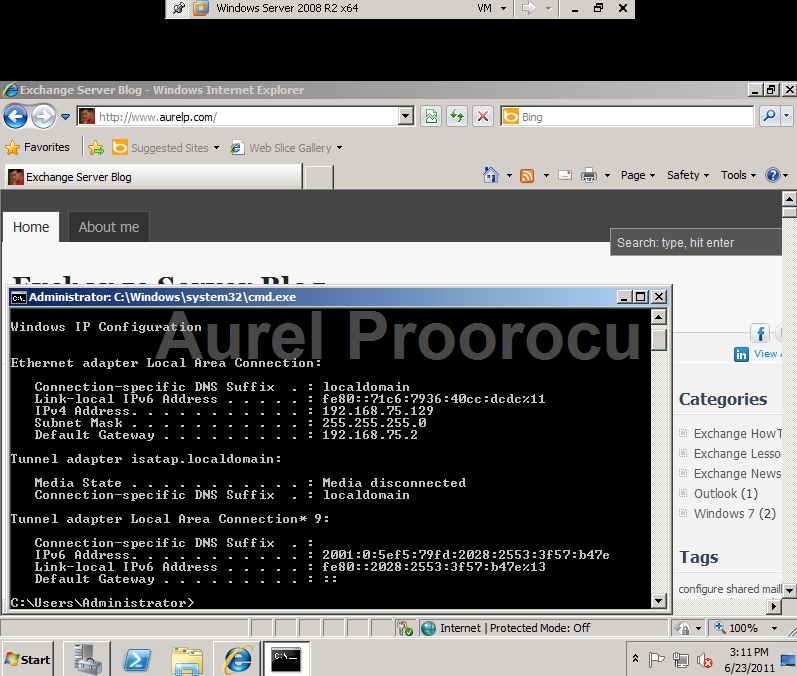
4. We are going to use a NAT connection for this example, but if you use a Bridged Network Adapter you should configure the IPs ( or skip step if you have DHCP ):

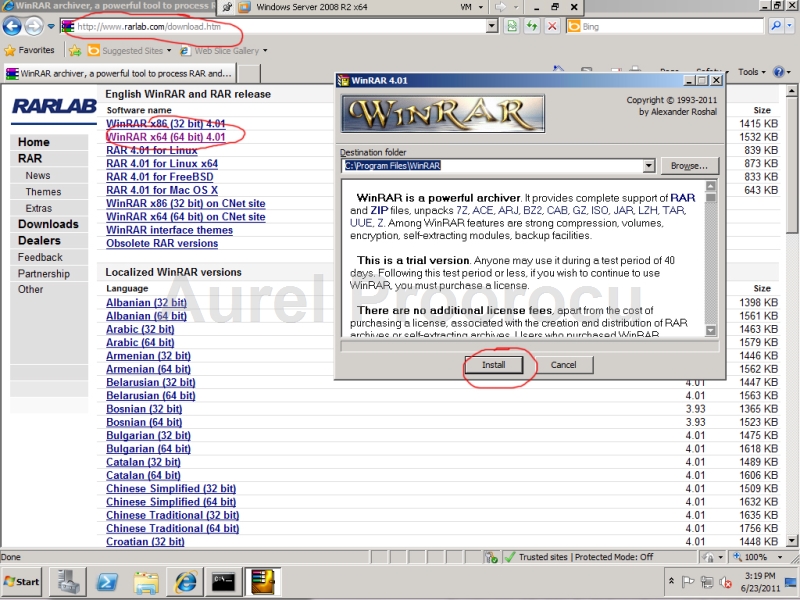
5. Install WinRar, or any other archive software/image player to open the exchange .iso file with. Or skip this step if you have the DVD.

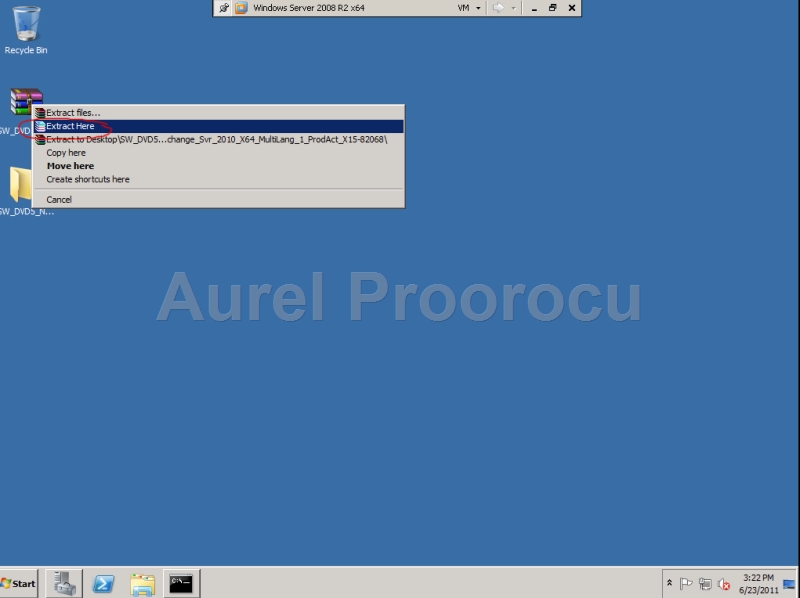
6. Now copy the Exchange 2010 ISO file on desktop, and then right click and extract here:

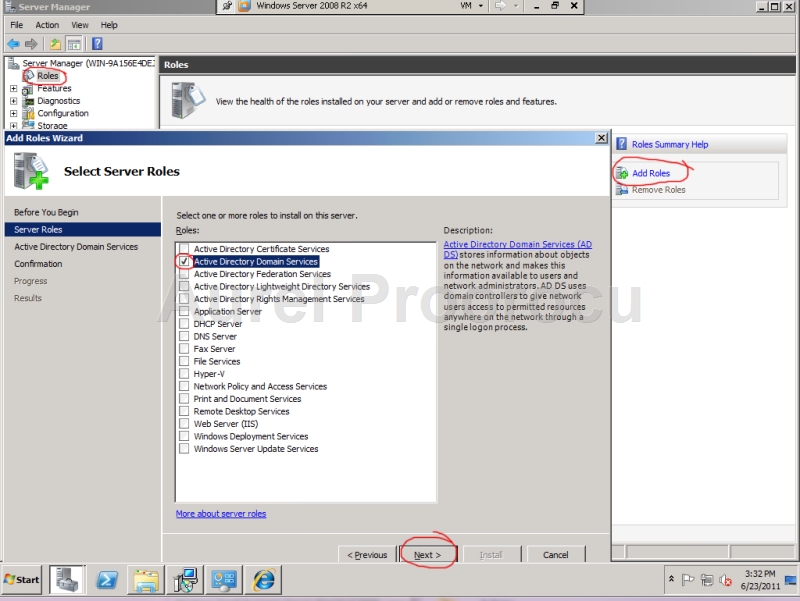
7. Then go to Server Manager ( Start / Administrative Tools / Server Manager ), and go to Roles, click on Add roles, and select: Active Directory Domain Services, and then NEXT:

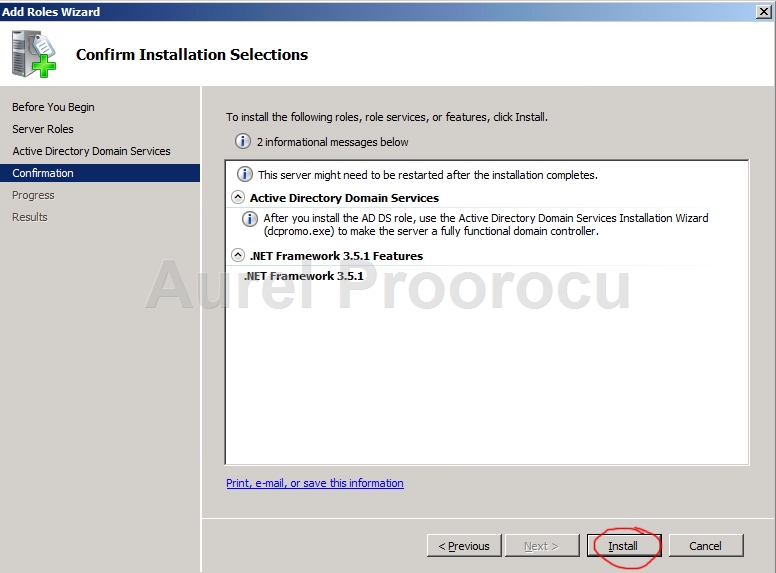
8. Then click INSTALL:

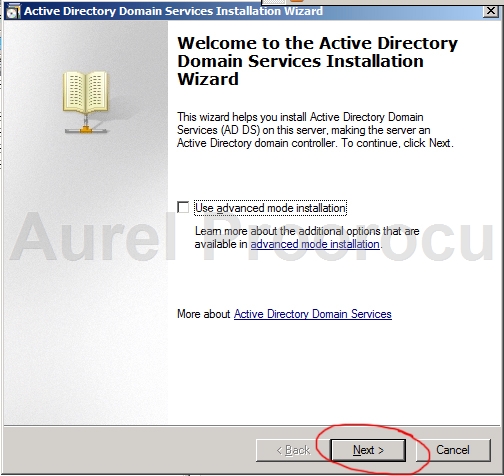
9. The ADDS Wizard will start, after that click NEXT:

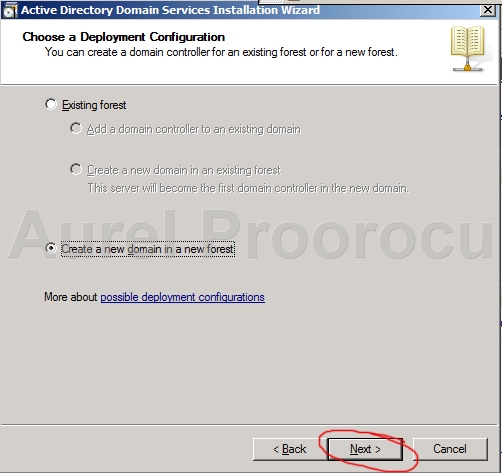
10. At the next step we will select: Create a new domain in a new forest, because we are installing a standalone server in a new domain. If you already have a domain or a forest select the option that fits you, then click NEXT:

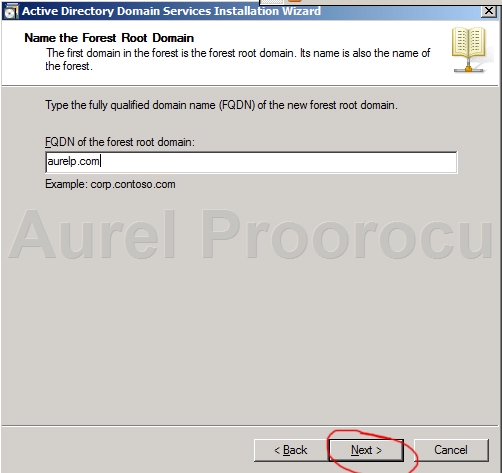
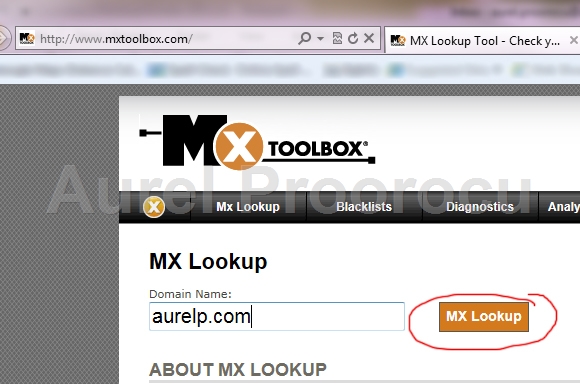
11. Now we have to insert the FQDN, in our case aurelp.com, then we click NEXT:

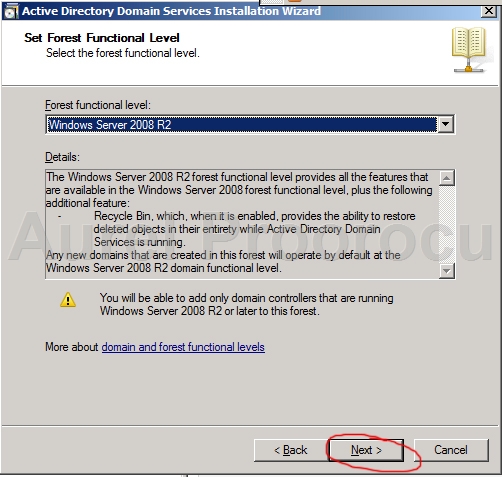
12. At this step we set the FFL ( Forest Functional Level ), which in our case will be Windows Server 2008R2. But you have to know that the Forest Function Level must be at least “Windows Server 2003″ for Exchange 2010 to work, so if it`s not you have to raise it.

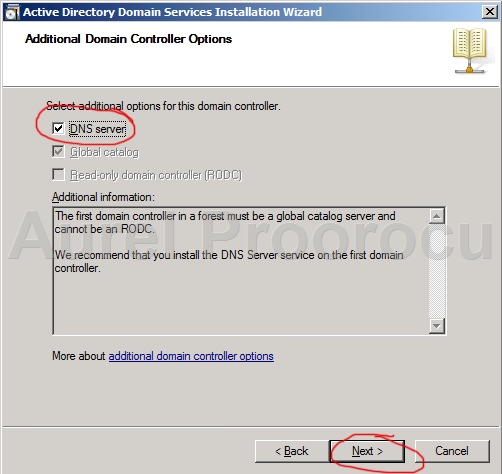
13. At this next step we configure the DC Options, we will select the DNS Server because we have only one server. Depending of your case, you select it or not, and then click NEXT:

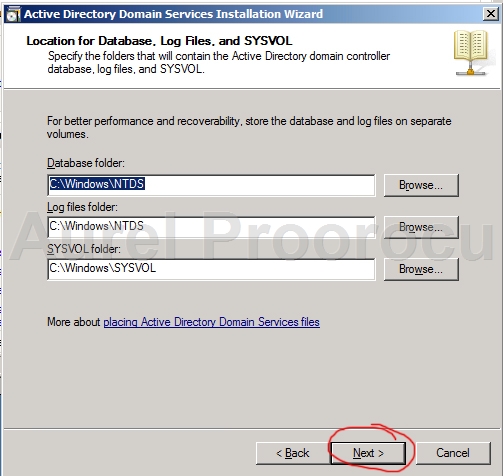
14. Here you can configure the Location for the Database / Log / SYSVOL. We will keep the default values, then click NEXT:

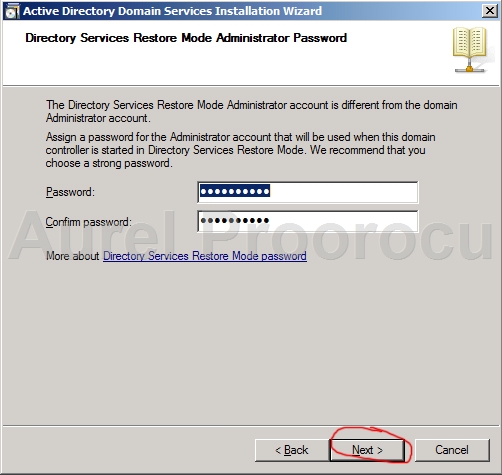
15. At this step you configure the AD Services Restore Mode Administrator Password. Insert it, and then click NEXT:

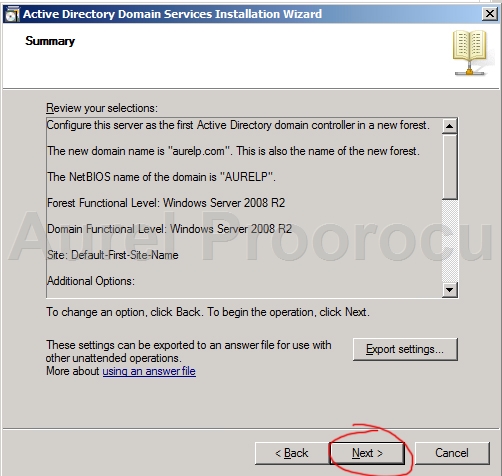
16. We are at the final step of the ADDS Wizard, where we review the selections. Review it and then click NEXT:

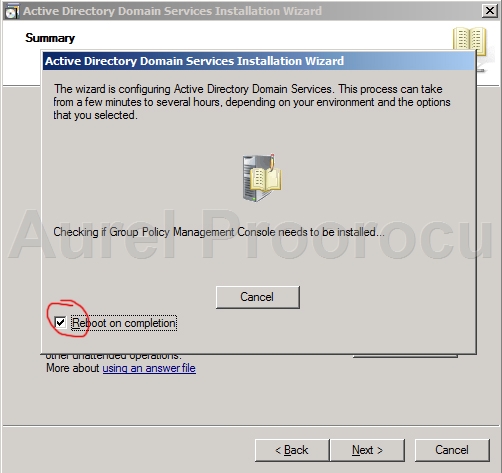
17. Now the wizard is going to configure ADDS, select Reboot on completion and go drink a coffee ( in our case it will take 10-12min but in some existing scenarios it might take 1-2hours ).

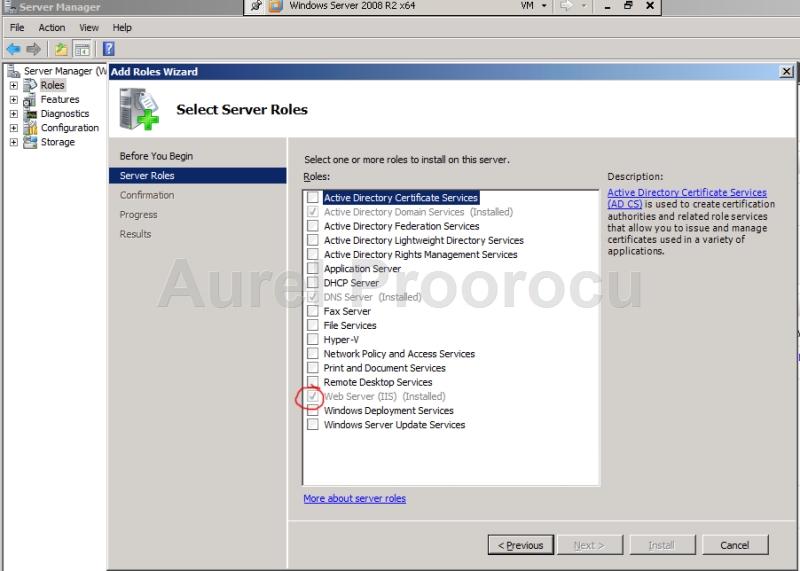
18. After you rebooted go back to Server Manager ( Start / Administrative Tools / Server Manager ), and go to Roles, click on Add roles, and select: Web Server (IIS) and click NEXT:
*You can select this Role at step 7, i put them separately so we can see the steps.

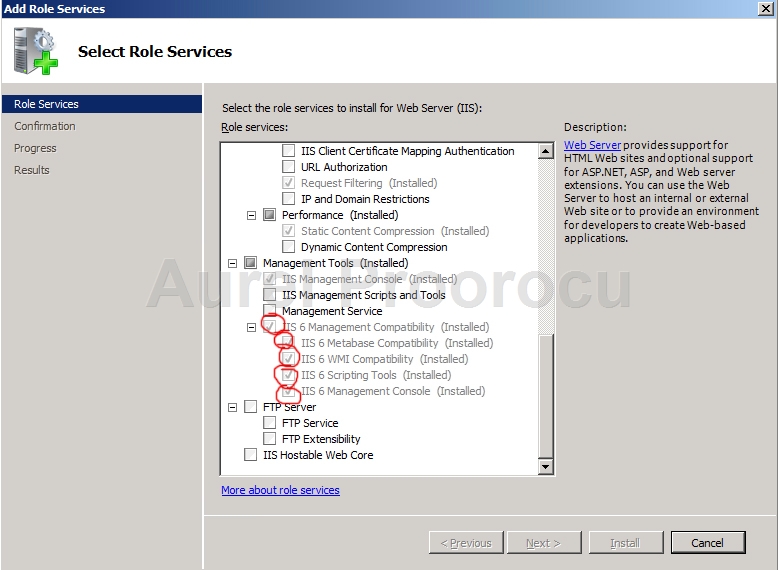
19. For the IIS Role, select the Services:
– IIS 6 Management Compatibility, and all the services that are under it, then click Install:

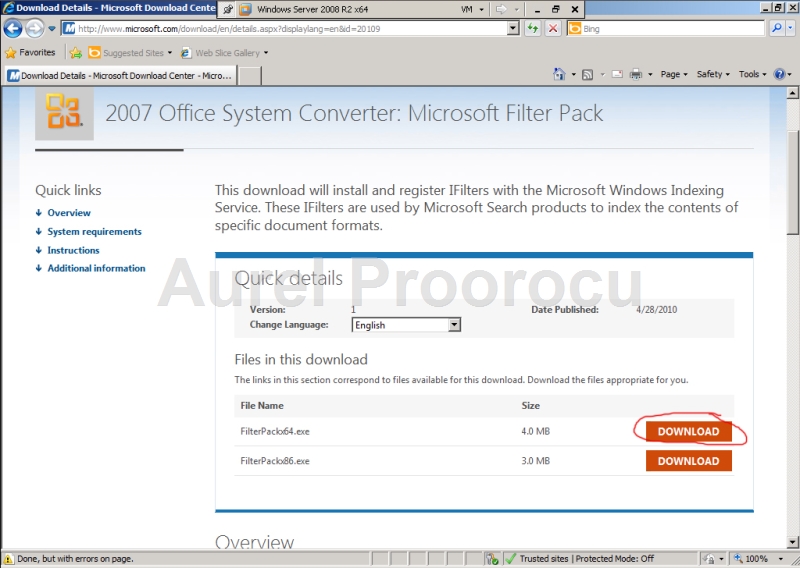
20. After the roles are installed reboot the Server. Then go to:
http://www.microsoft.com/download/en/details.aspx?displaylang=en&id=20109
And download 2007 Office System Converter: Microsoft Filter Pack:

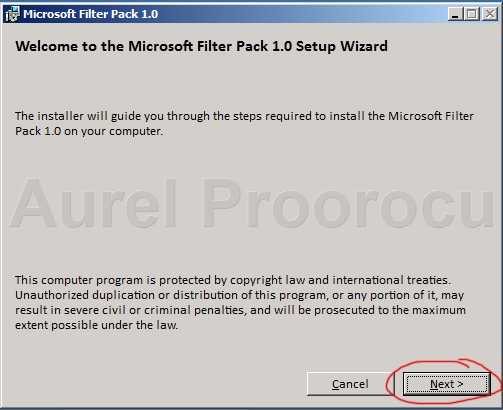
21. After the FilterPack64.exe is downloaded, run it. And the install wizard will appear, and we click NEXT:

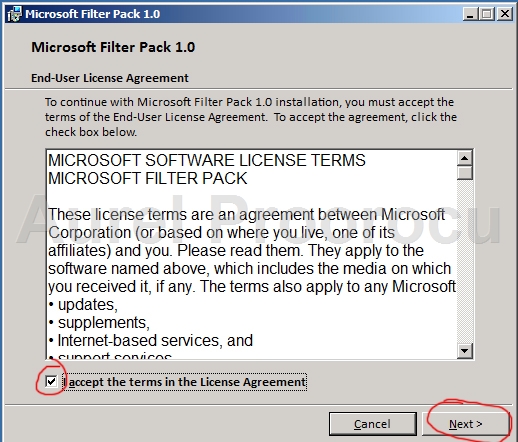
22. We accept the terms, and click NEXT:

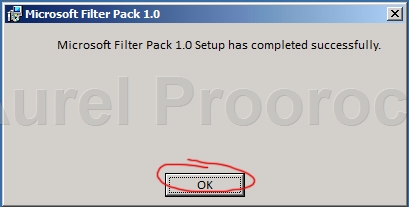
23. After the install we click Ok:

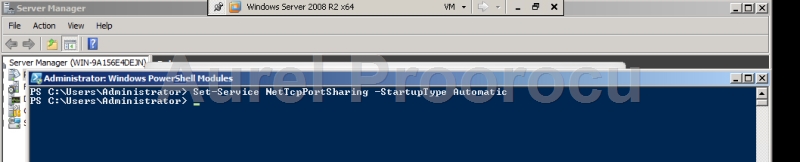
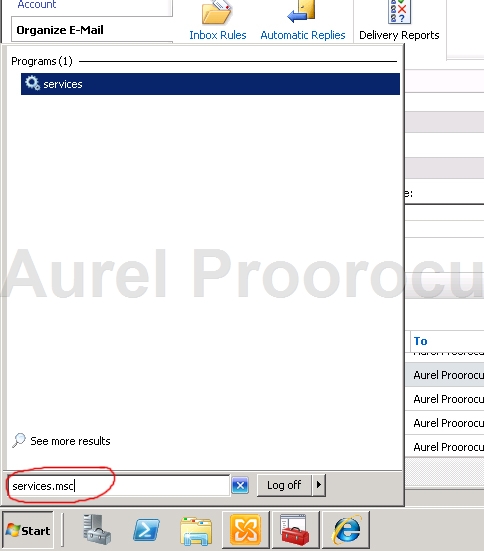
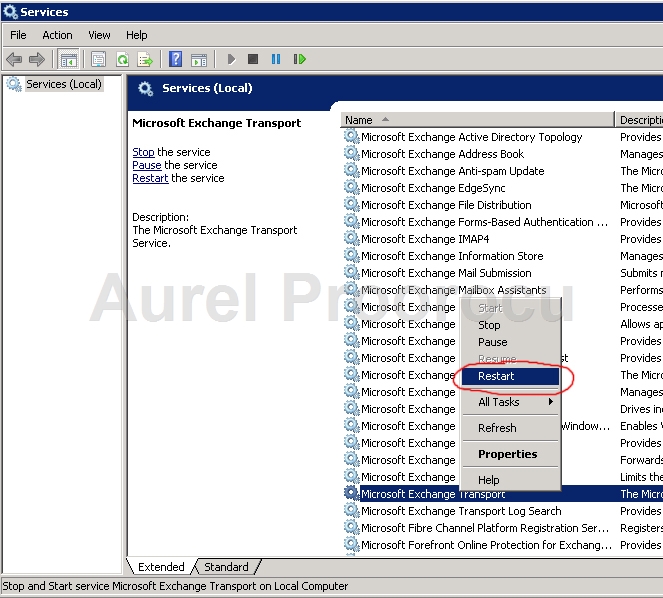
24. The next step is to open the Windows PowerShell ( Start / Administrative Tools / Windows PowerShell Modules ). After it loads we enter the following command:

Set-Service NetTcpPortSharing -StartupType Automatic

*This will change startup mode of “Net.Tcp Port Sharing Service” from Manual to Auto for Client Access Server installation

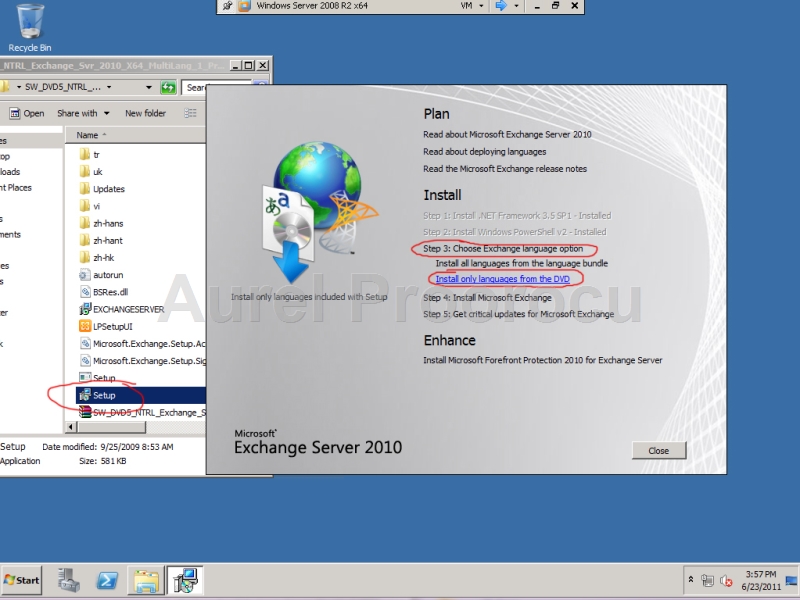
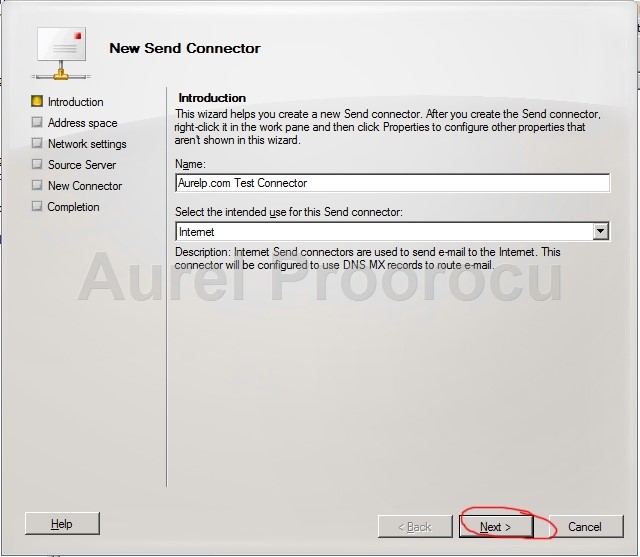
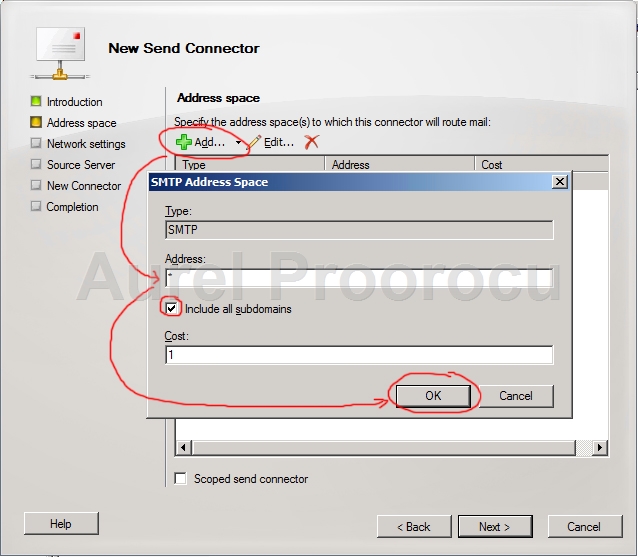
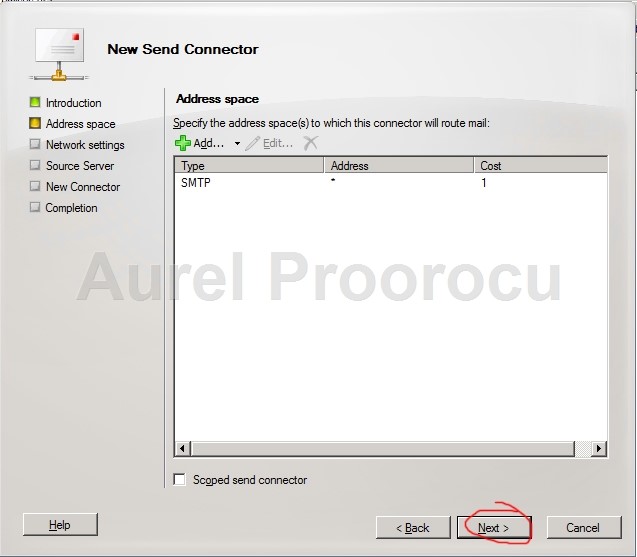
25. After that, we open the folder that contains the Exchange 2010 installation files, and we click onSetup.exe. After the installer starts, we click on Step3: Choose Exchange language options and then on Install only languages from the DVD.
*We select “Install only languages from the DVD” because we want English, if you want other language chose the other option: “Install all languages from the language bundle” 

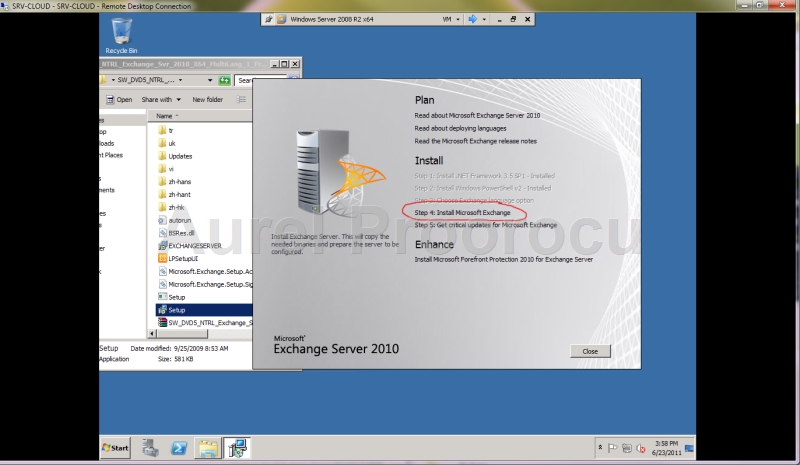
26. Then we click on “Step 4: Install Microsoft Exchange” and start the installation:

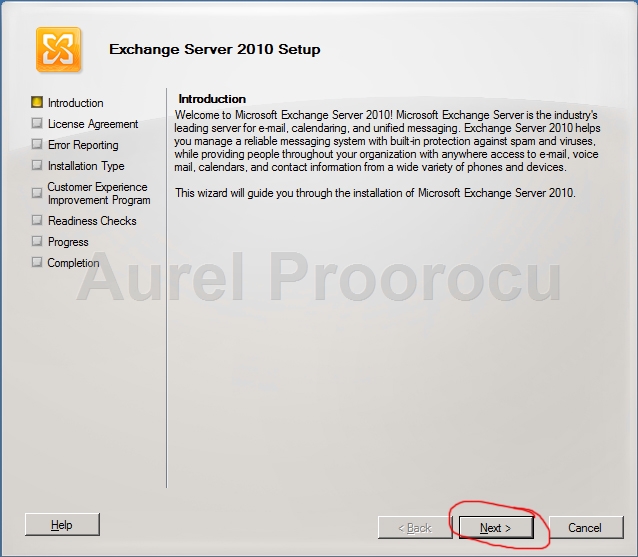
27. This is the first step of the wizard, we read the introduction and then click NEXT:

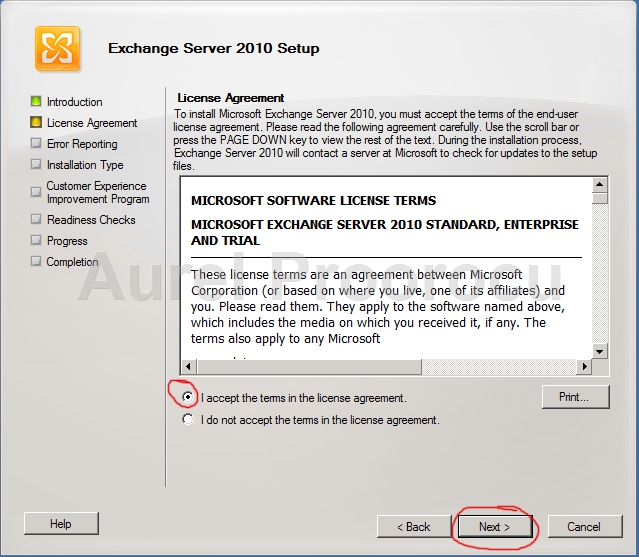
28. Now we read & accept the terms and click NEXT:

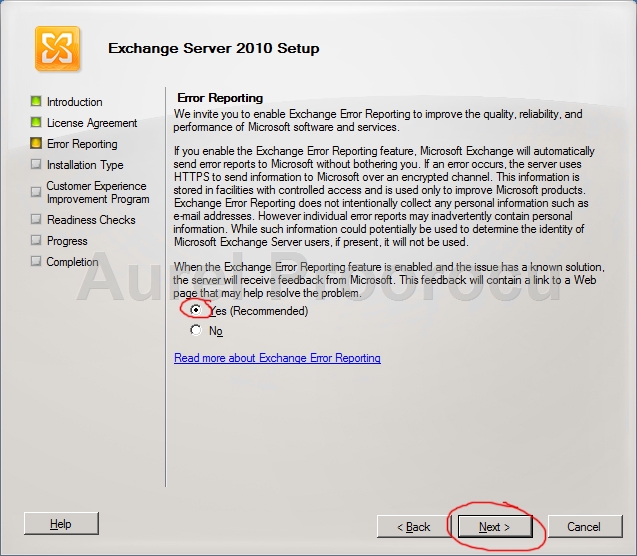
29. Now we can choose either if we want, or not to send error reporting. I recommend to select Yesbecause this helps Microsoft find bugs and improve the product, and then click NEXT:

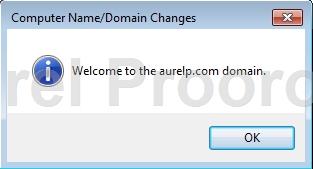
30. Here we choose the Installation Type. We will go for a Custom install. Click on it, and then NEXT:

31. Now we select the server roles. In our case we will go for the mailbox role / client access and Hub Transport. But this may vary from case to case. After this chose the folder in which Exchange 2010 will install ( we will keep the default location ). Then click NEXT:

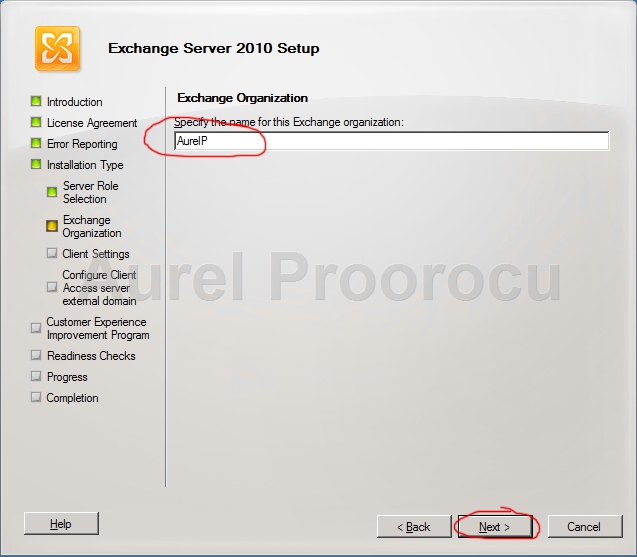
32. At this step we specify the name for the Organization. In our case we put AurelP, and then click NEXT:

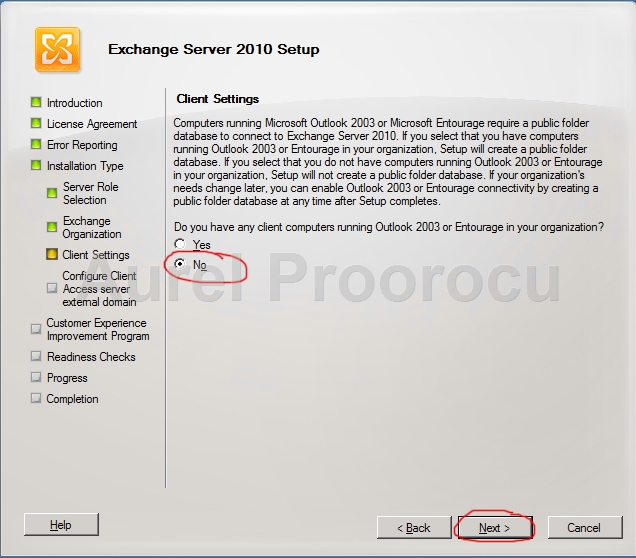
33. At this step you should be very careful. If you still have Outlook 2003 or Entourage in your organization select YES. In our case we will use Outlook 2010 so we select No, and then click NEXT:

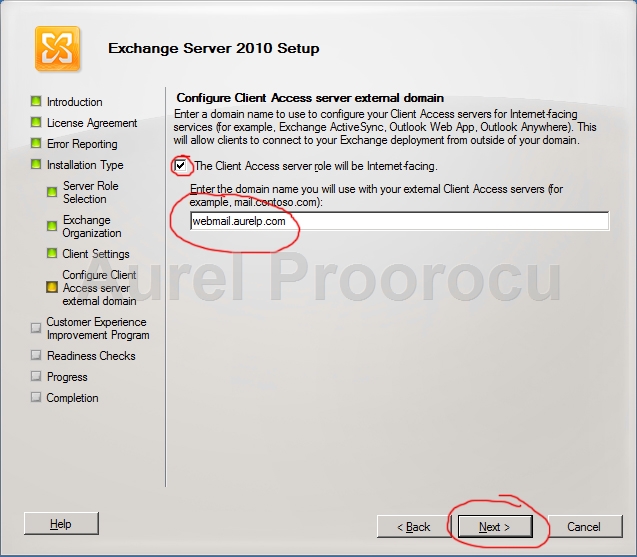
34. Now we configure the Client Access Server external Domain. This will configure Internal URL and External URL for services of Client Access. In our case it will be: webmail.aurelp.com, and we hit NEXT:

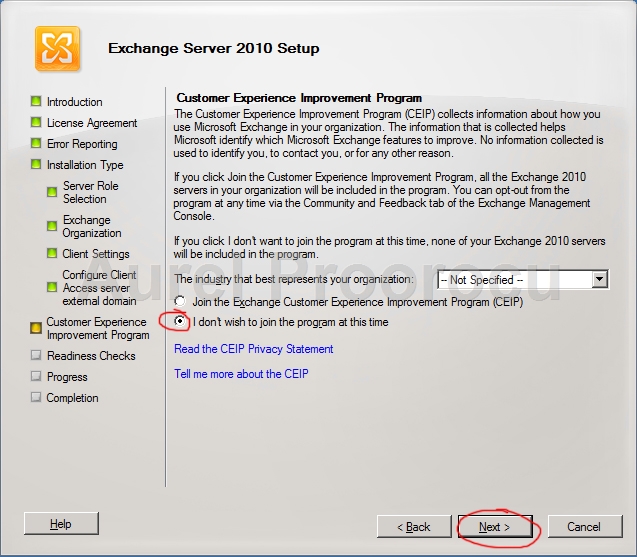
35. Now you can select if you want to join the Customer Experience Improvement Program. We will select “I don`t wish to join the program at this time” and click NEXT:

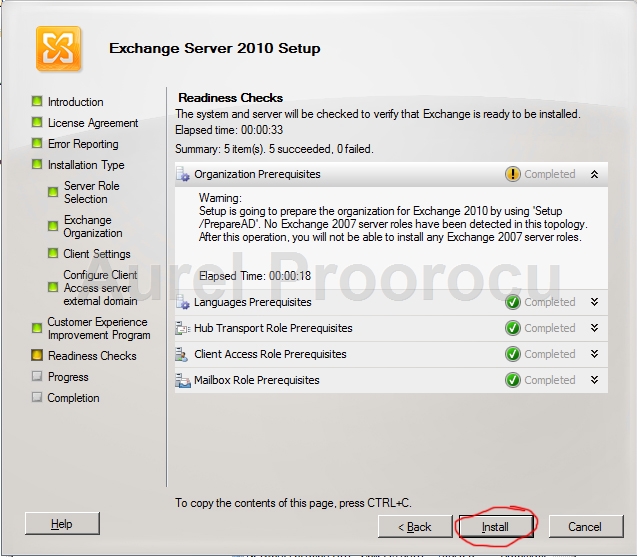
36. The next step is Readiness Checks, where the installer will check if Exchange is ready to be installed. If you followed the tutorial so far it should like in the next image. However if error occur, they will have instructions of how to fix it. If everything is Ok, click INSTALL:

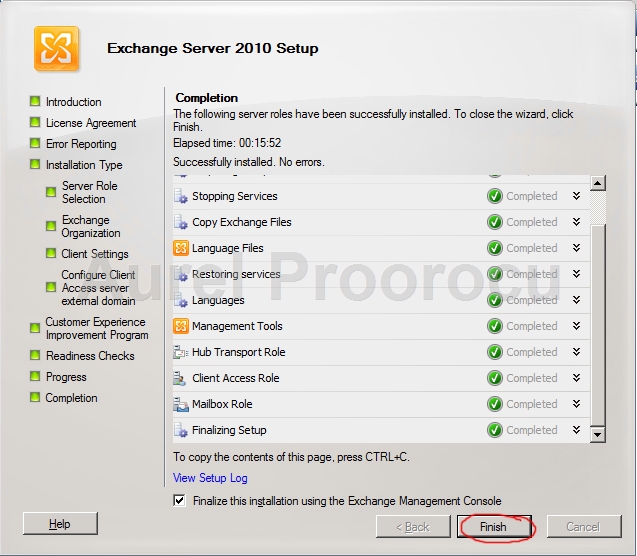
37. And the last step of the installation is Completion. Here you can see what was successfully installed. When they are all Completed, select Finalize this installation using the Exchange Management Console and click FINISH:

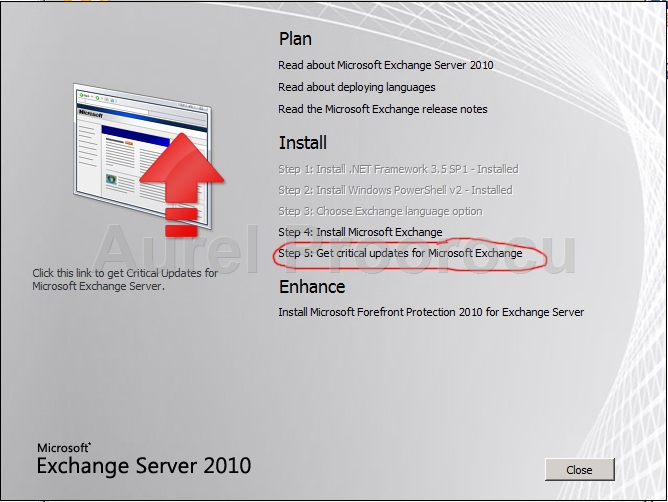
38.Now you will go back to the initial installer screen. Here you should select Step5: Get critical updates for Microsoft Exchange and then follow the update procedure.

39. After that the EMC ( Exachange Management Console ) will start and you will be prompted to license your software.

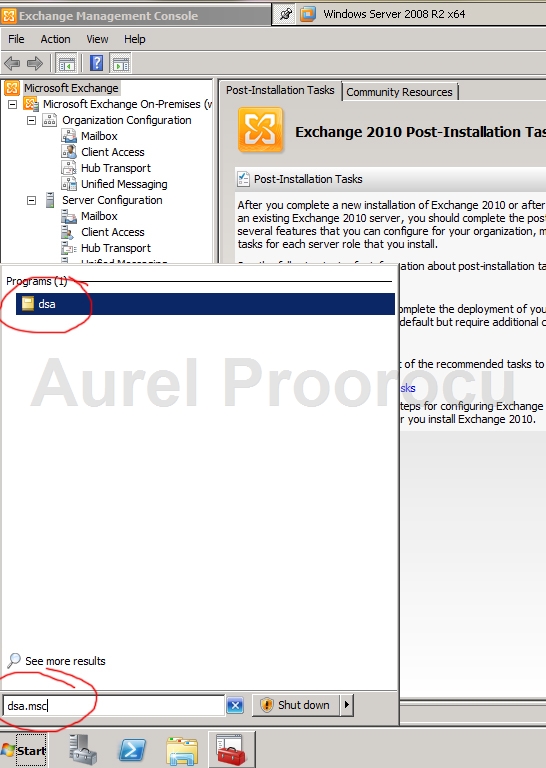
40. The next thing we are going to do in this tutorial is to create a new user and create an e-mail address for him. For that we go Start and type: dsa.msc and then press Enter. ( or go to Start / Administrative Tools / Active Directory Users and Computers )

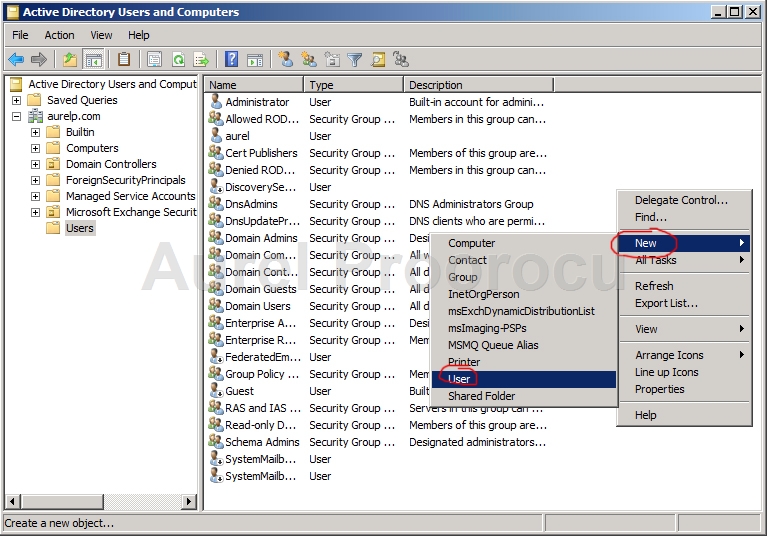
41. Here we expand the domain ( in our case aurelp.com ) and then go to the Users OU. ( this may vary from case to case if you already have an AD structure ). Then we right click somewhere in the right side and select New / User.

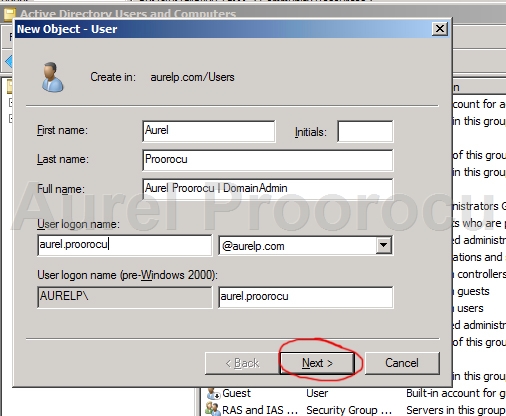
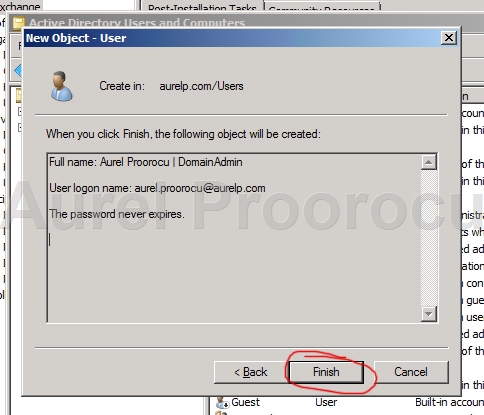
42. And the User Wizard will start. Complete all the fields with the information of the new user, then click NEXT:

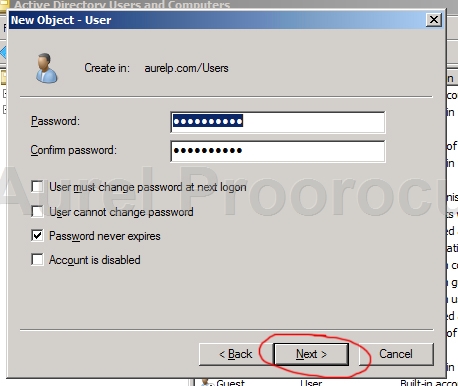
43. At the next step we set the password. Insert it and then select the password options, then click Next:

44. Now the user was created, and we click FINISH:

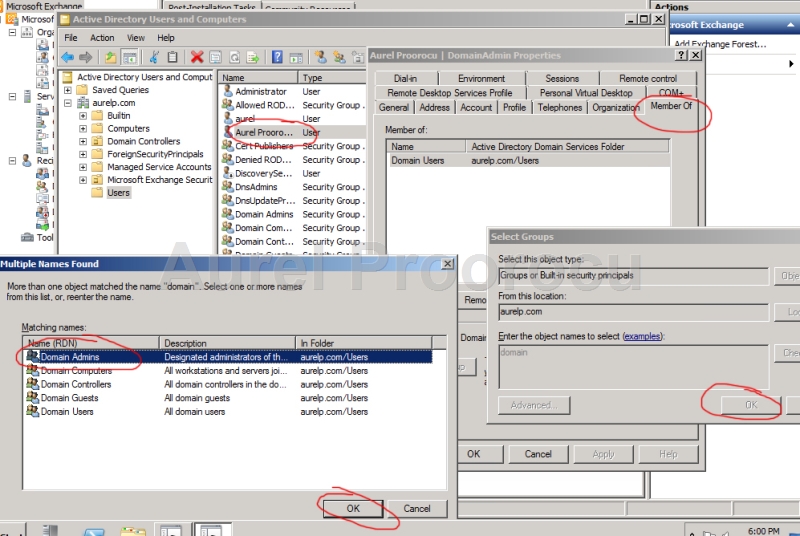
45. After that, we double click on the newly created user, and the proprieties window will appear. Here we go to Member Of Click on ADD / Type domain in the “Enter the Object names to select” and then clickOK, and in the new list that appears double click on Domain Admins, and after that OK and OK.
*This will make the new user account an domain admin**. If you don`t want to do this skip this step. If you don`t know what a domain admin is:
**Domain Admins – a global group whose members are authorized to administer the domain. By default, the Domain Admins group is a member of the Administrators group on all computers that have joined a domain, including the domain controllers. Domain Admins is the default owner of any object that is created by any member of the group.

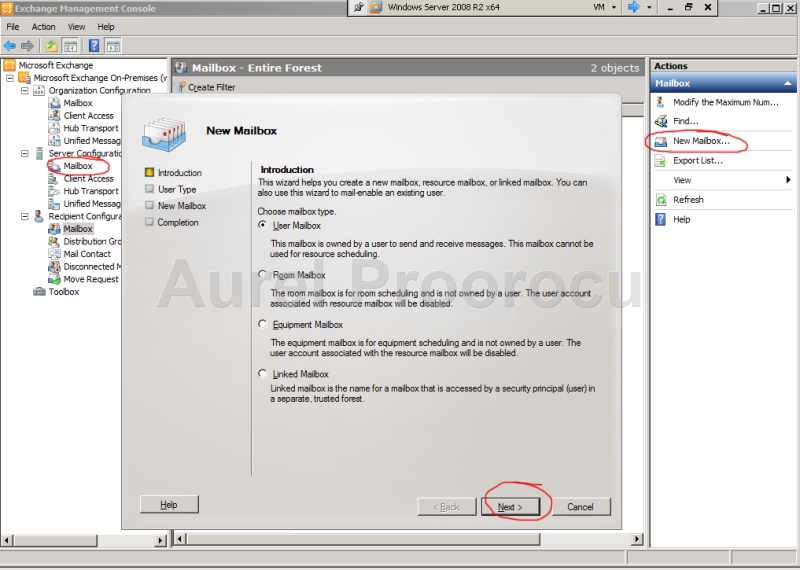
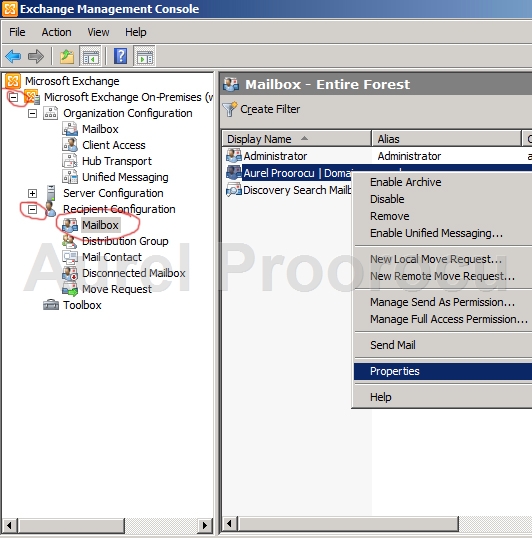
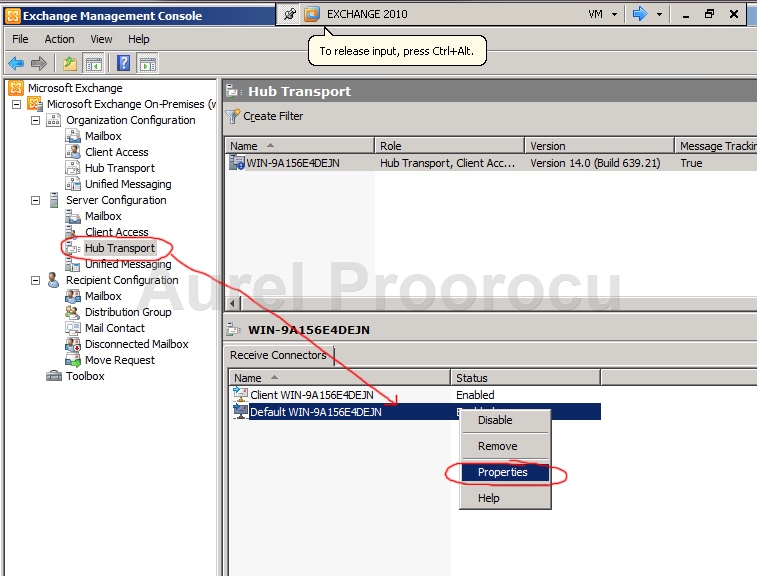
46. Now go back to EMC ( Exchange Management Console ), expand Microsoft Exchange ON-Premises, and then under Server Configuration click on Mailbox. Now in the right side menu click on New Mailbox. After that the wizard will appear, select User Mailbox and click NEXT:

47. At the next step select Existing users / ADD, and then search for the user you just created, select it and then press OK and NEXT:

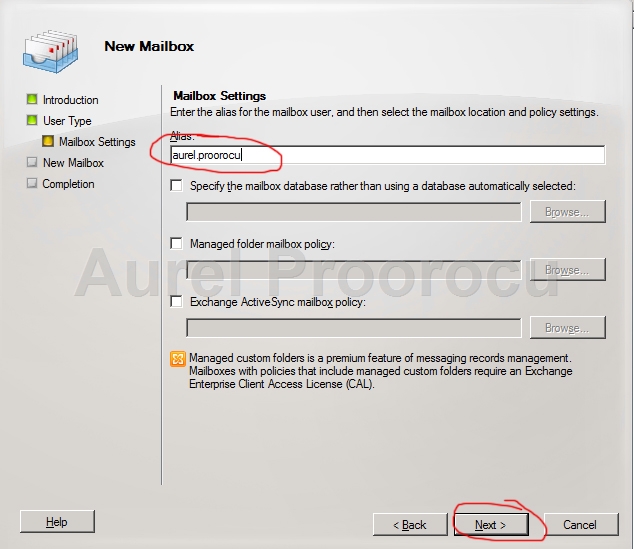
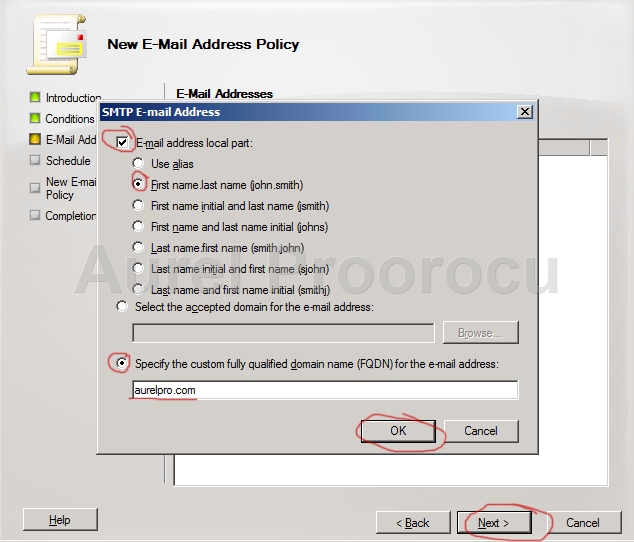
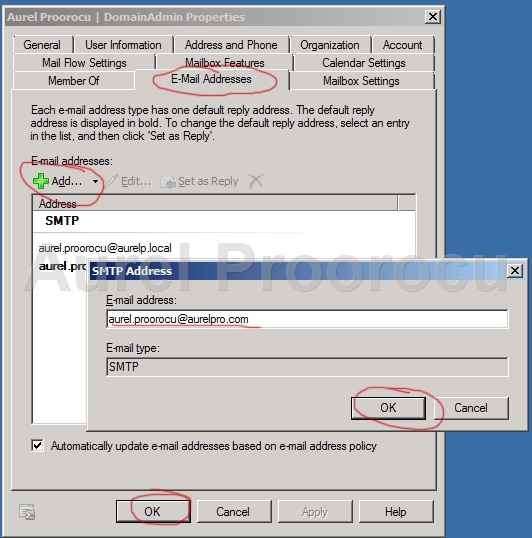
48. At the next step you must select the Alias, that is usually the same as the username. Then you select the mailbox you want to put the new e-mail account in ( if you don`t select, it will auto set thedefault one ).
The next options are for Managed folder mailbox policy ( if you have more then one ), and the Active Sync mailbox policy ( if you also have more then one ).
Select the options that fits you best, then click NEXT:

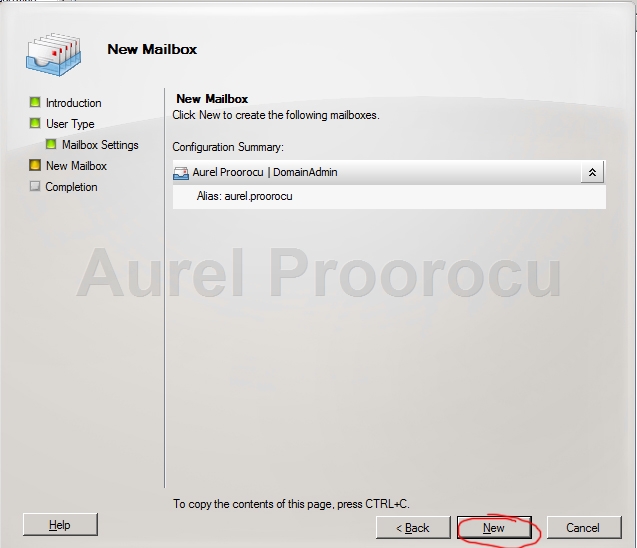
49. Now the Configuration Summary will be displayed. Review it and click NEW:

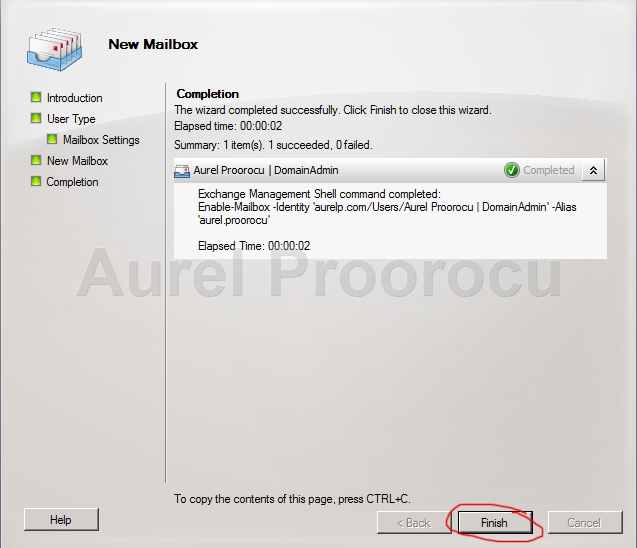
50. The last step is the Completion. After you see the Completed status click FINISH:

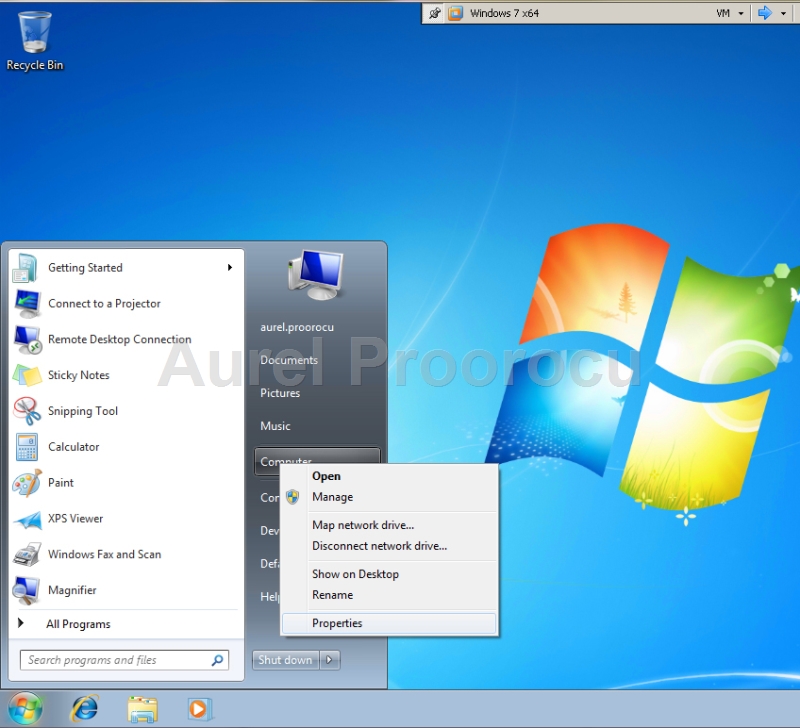
51. For the next step of the Tutorial we will need a Windows 7 virtual machine that is connected in the same network with the Exchange Server Virtual Machine. We created this using VMWARE and a kit of Windows 7 x64. After the install is ready, log on to the machine and go to Start / right click on MY COMPUTER and select PROPERTIES:

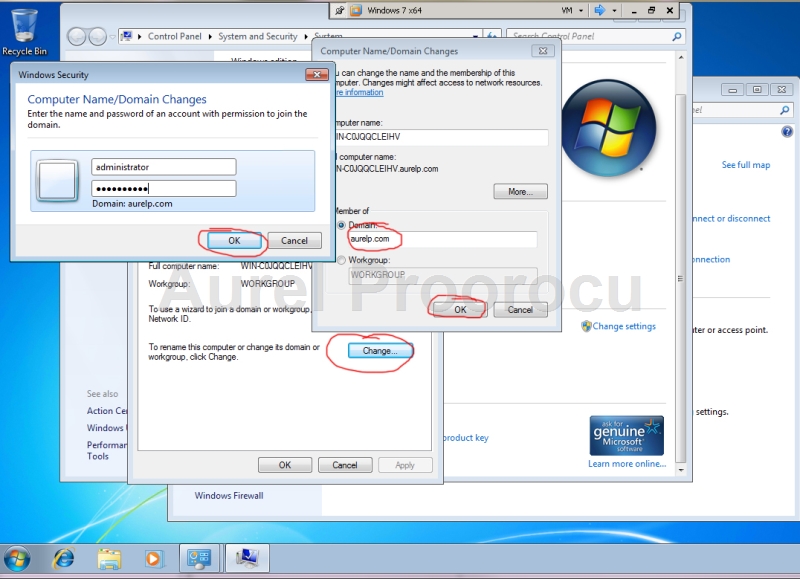
52. Now the System window will appear. Here go to Computer name,domain, and workgroup settings and click on Change Settings. After the System properties appears, click on Change ( on the computer name tab ). Now select domain, and insert the name of your domain ( in our case aurelp.com ) and change the computer name ( if you want ), after that click OK. You will be prompted for credentials. Here insert user: Administrator, and the password you set at the domain wizard ( in our case we could use the aurel.proorocu account because it`s a domain admin, and if you already have a domain use an Domain admin account ).

53. After it completes the following window will pop-up. Click OK:

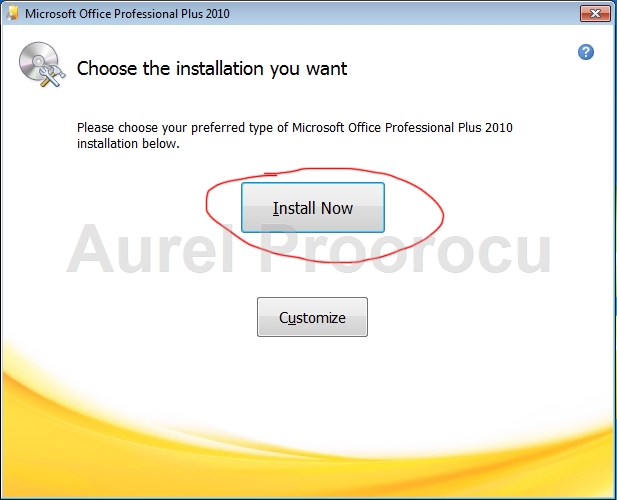
54. For the next step we will need an Office KIT ( we will use Office 2010 Plus x64 ). Double click on thesetup and the wizard will appear. Enter the Product Key, and click CONTINUE:

55. At the next Step we select what to install. We will go for the typical and click Install now. If you want to customize it click on Customize:

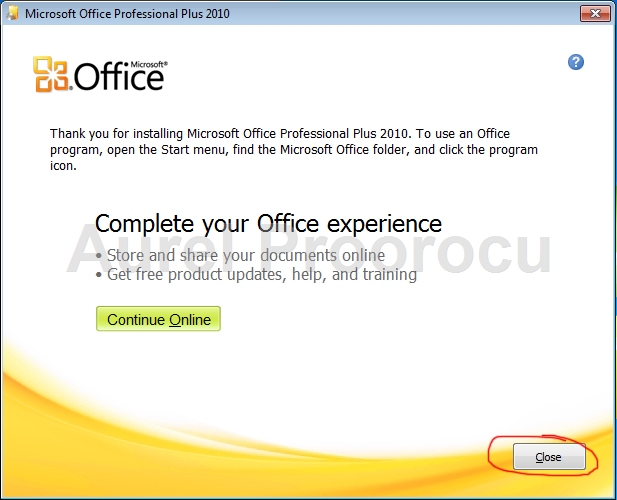
56. After the setup had finished click CLOSE:

57. Now go to START / click on the button next to Shut down and select LOG OFF:

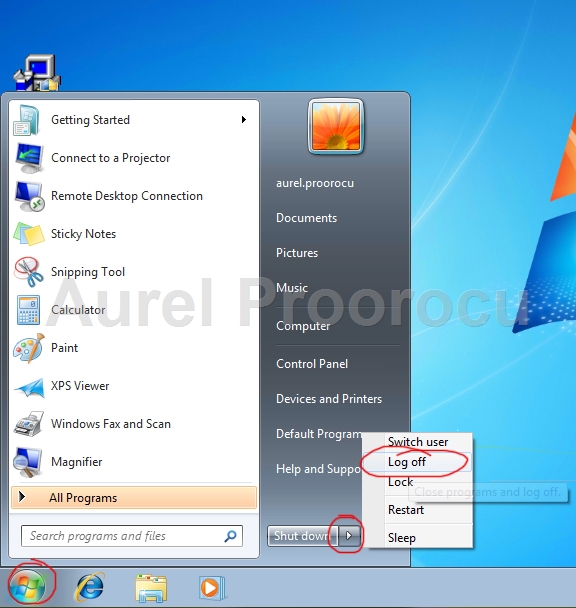
58. Now click on SWITCH USER:
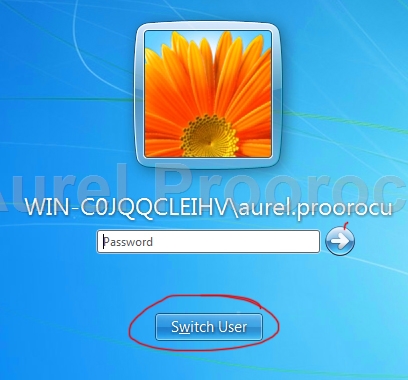
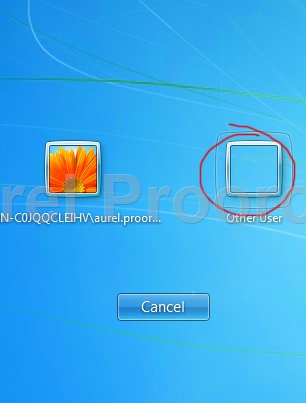
59. Click on Other USER:

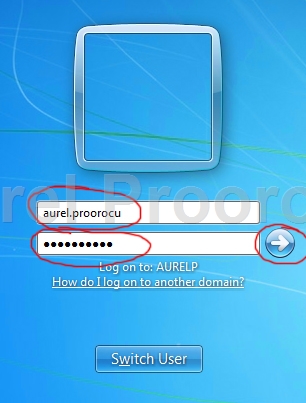
60. And insert the credentials of the user you created, then press ENTER:

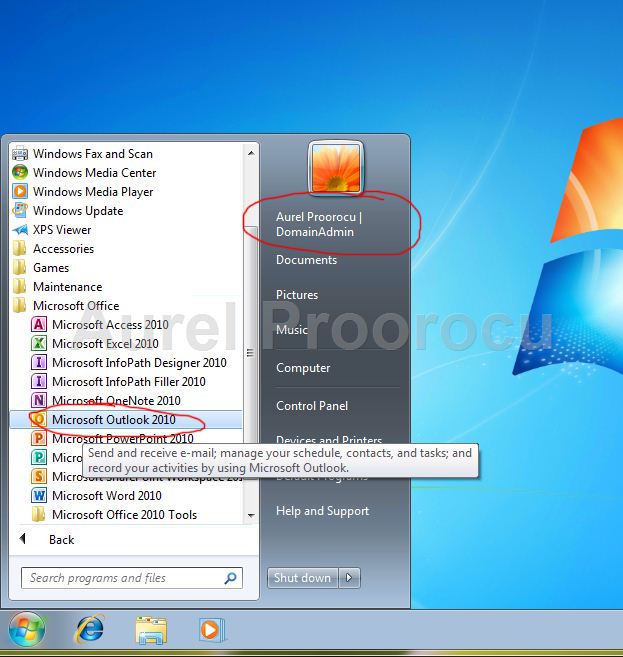
61. After the windows user loads, go to Start / All Programs / Office / Outlook 2010 :

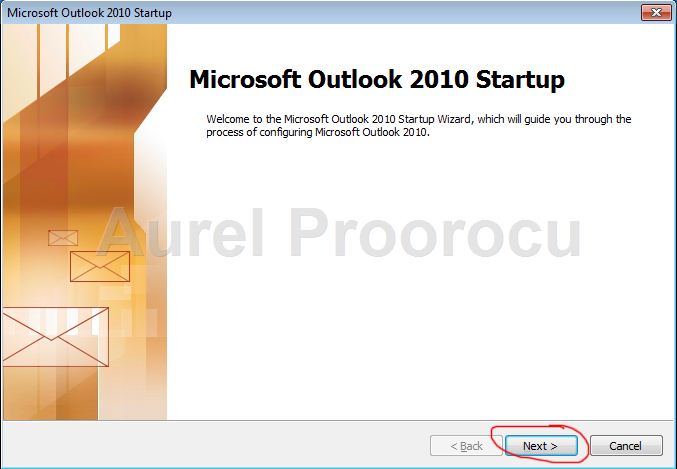
62. Then the Outlook wizard will appear. Click NEXT:

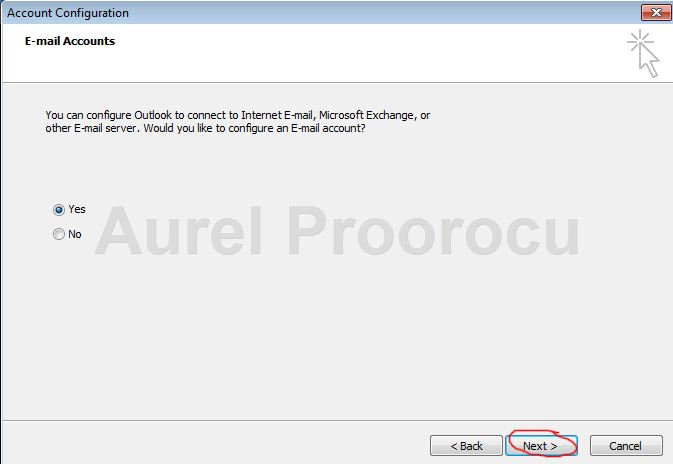
63. Select YES, and then click NEXT:

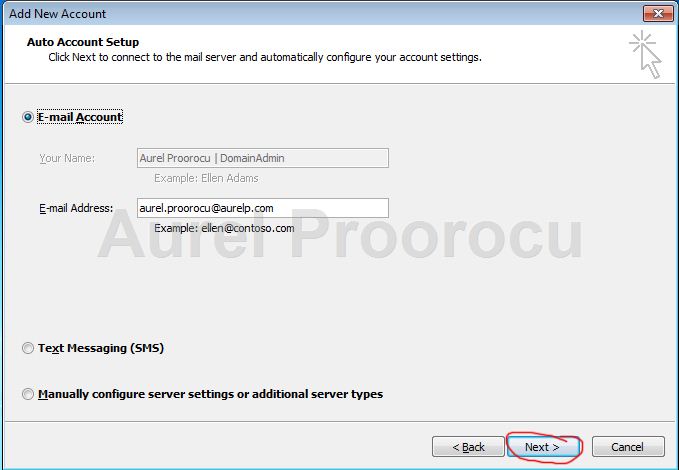
64. The Exchange Account should be auto completed, then click NEXT:

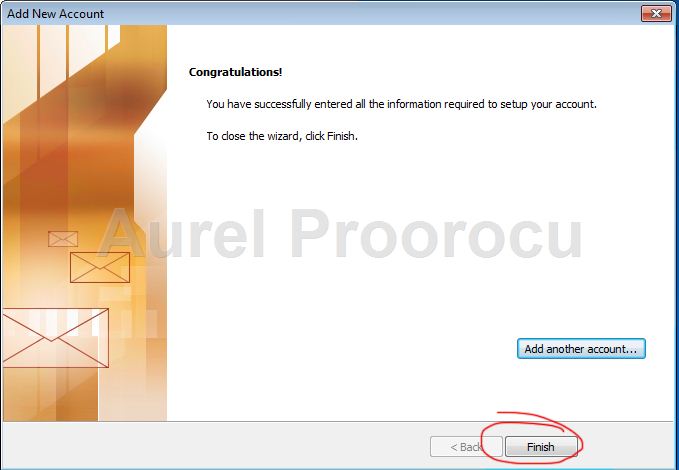
65. At the last step click FINISH:

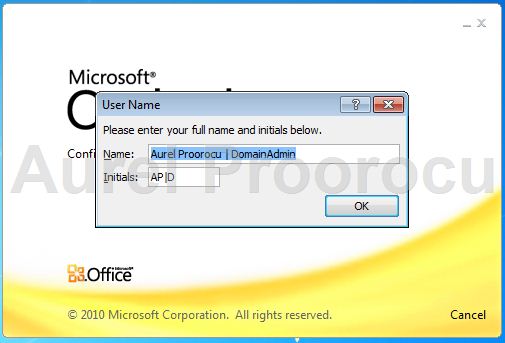
66. Now Outlook will begin to load and will prompt for full name and initials. Insert them and click OK:

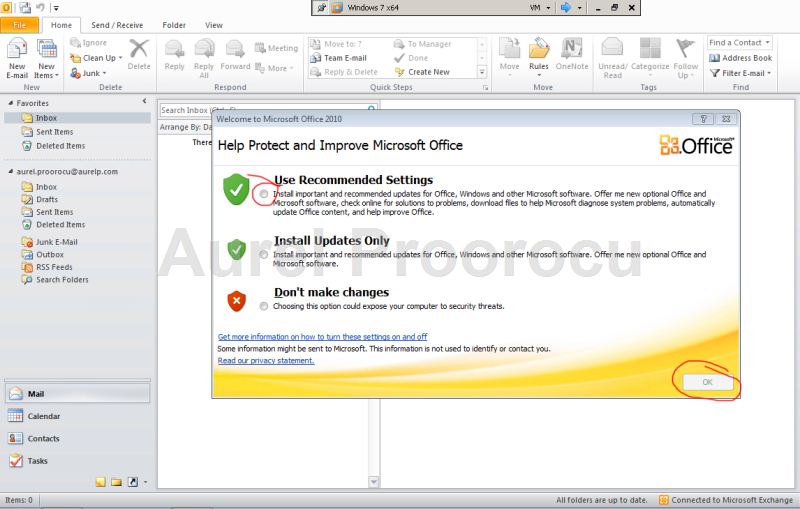
67. Select the Use Recommended Settings, and press OK. And you are now Connected to Microsoft Exchange ( right-down ).

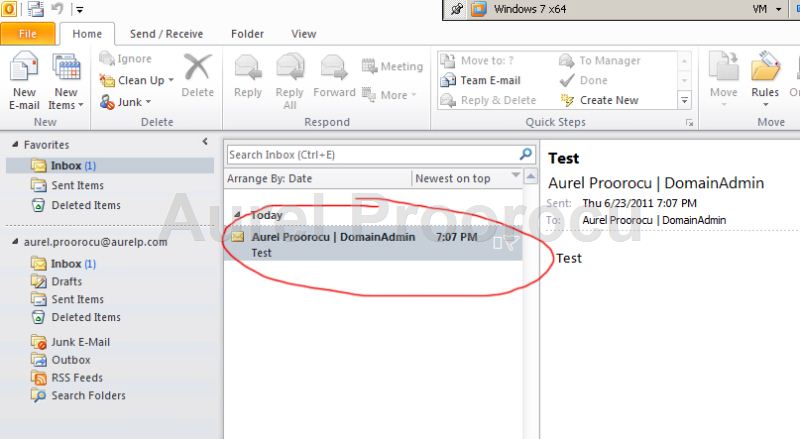
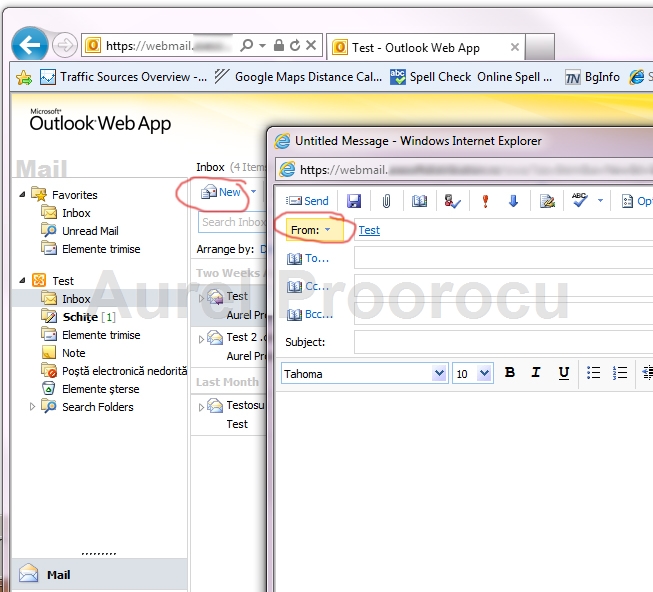
68. You can make an e-mail test, and enjoy your new Exchange 2010 Server.

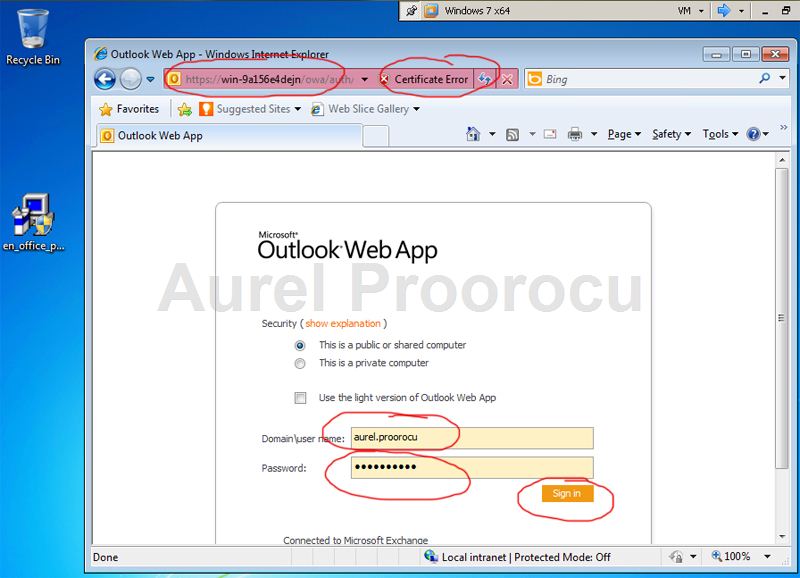
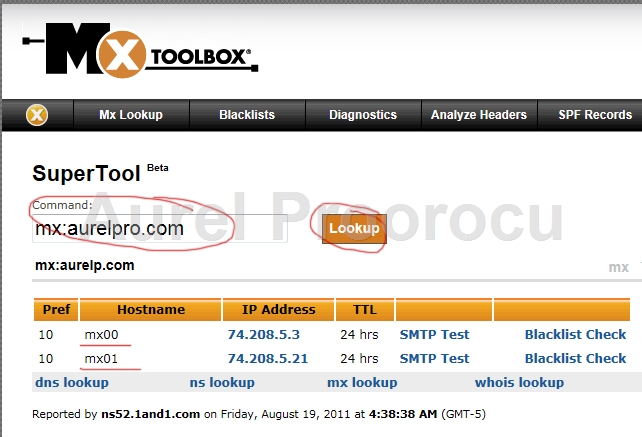
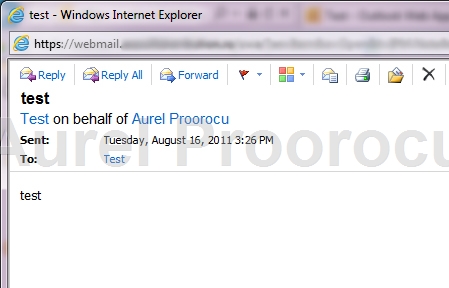
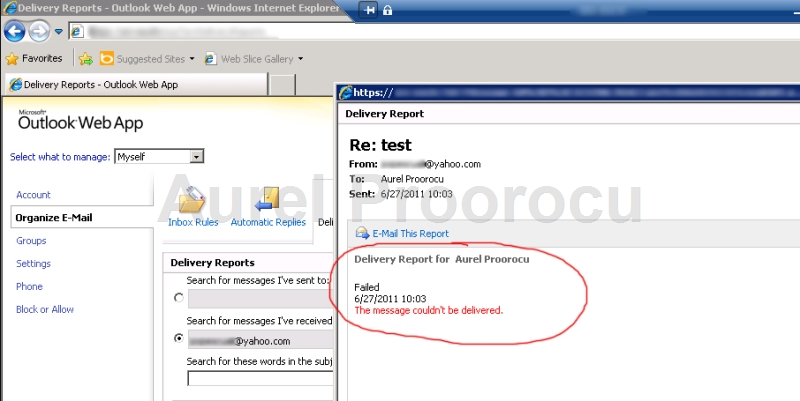
69. You can also check the OWA, using this link: https://nameofserver/owa , where name of server is the computer name of the Exchange 2010 Server ( in our case WIN-9a156e4dejn ).
You will also get an Certificate ErrorI will later explain the Certificates and make an tutorial.

ENJOY.

And if you encounter any problems feel free to comment contact me.

How to add a mail server to whitelist, on exchange 2010 ? Step-By-Step

This is a very common problem…
The client cannot send e-mails to someone in your organization because his e-mail server is on a blacklist, and the mail gets blocked and he receives this message:

host mail.aurelp.com [90.150.150.90] said: 550 5.7.1 :127.0.0.3:Client host 90.180.140.10 blocked using 88.blocklist.zap; Mail from IP banned. To request removal from this list please forward this message to delist.forefront@messaging.microsoft.com (in reply to RCPT TO command)

* Where mail.aurelp.com is your mail server, 90.150.150.90 is your mail server ip address, and 90.180.140.10 is his mail server ip address

Solution:

1. You need to find all the IP Addresses of the mail servers of the user that has the problem. This step is recommended even if he gives you the ip you should enter on the whitelist, because they may havemultiple mail servers.
To check the domain for mail servers, go to www.mxtoolbox.com and enter the domain ( for example: aurelp.com ) in the MX Lookup, then click on the button:

2. Now open the Exchange server and go to the EMC ( Exchange Management Console ). Here expand the Server Configuration menu ( in the left ), and click on Hub Transport. Now click on Anti-Spam tab ( center-middle ), and then double click on IP ALLOW LIST.


3. A new window will appear. Here click on the Allowed Addresses tab, and then click ADD.


4. Here you enter the IP ADDRESS of the mail server that is blacklisted. If they have multiple servers, repeat step 3 and for all of them. After that they should be able to send mails to users in your organization.

upload6

ENJOY.

And if you encounter any problems feel free to comment contact me.